前言
簡單聊一下cocos2djs手遊的逆向,有任何相關想法歡迎和我討論^^
一些概念
列出一些個人認為比較有用的概念:
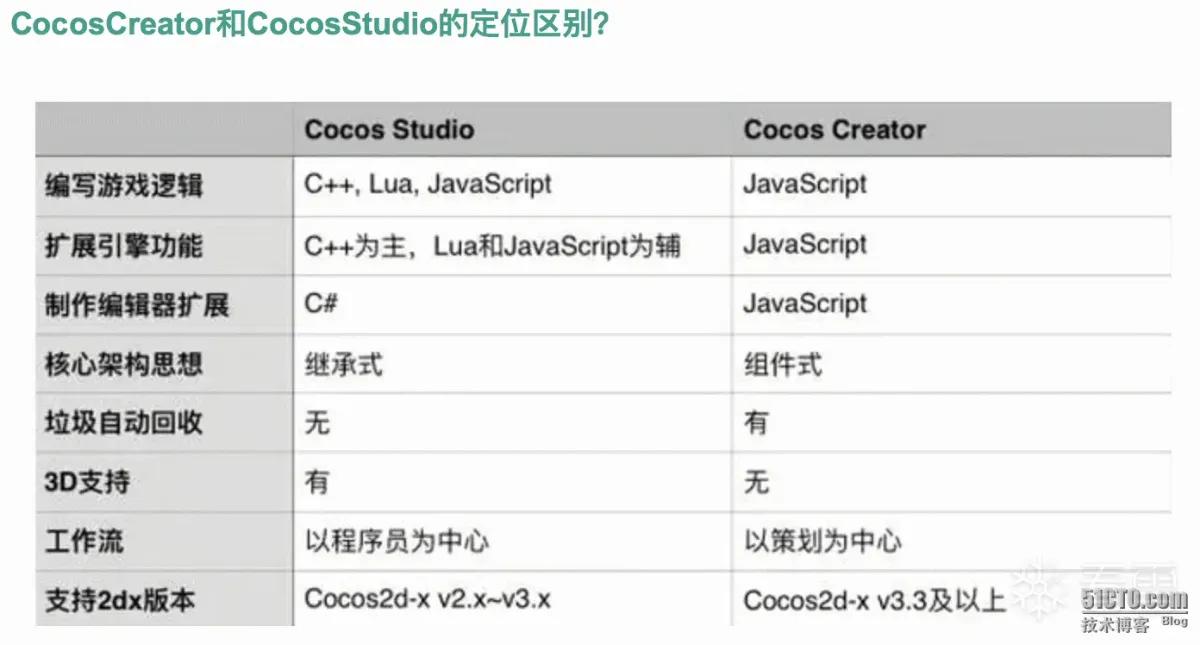
- Cocos遊戲的兩大開發工具分別是
CocosCreator和CocosStudio,區別是前者是cocos2djs專用的開發工具,後者則是cocos2d-lua、cocos2d-cpp那些。
- 使用
Cocos Creator 2開發的手遊,生成的關鍵so默認名稱是libcocos2djs.so - 使用
Cocos Creator 3開發的手遊,生成的關鍵so默認名稱是libcocos.so( 入口函數非applicationDidFinishLaunching) - Cocos Creator在構建時可以選擇是否對
.js腳本進行加密&壓縮,而加密算法固定是xxtea,還可以選擇是否使用Zip壓縮

libcocos2djs.so裡的AppDelegate::applicationDidFinishLaunching是入口函數,可以從這裡開始進行分析- Cocos2djs是Cocos2d-x的一個分支,因此https://github.com/cocos2d/cocos2d-x源碼同樣適用於Cocos2djs
自己寫一個Demo
自己寫一個Demo來分析的好處是能夠快速地判斷某個錯誤是由於被檢測到?還是本來就會如此?
版本信息
嘗試過2.4.2、2.4.6兩個版本,都構建失敗,最終成功的版本信息如下:
- 編輯器版本:
Creator 2.4.13( 2系列裡的最高版本,低版本在AS編譯時會報一堆錯誤 ) - ndk版本:
23.1.7779620 project/build.gradle:classpath 'com.android.tools.build:gradle:8.0.2'project/gradle/gradle-wrapper.properties:distributionUrl=https\://services.gradle.org/distributions/gradle-8.0.2-all.zip
Cocos Creator基礎用法
由於本人不懂cocos遊戲開發,只好直接用官方的Hello World模板。
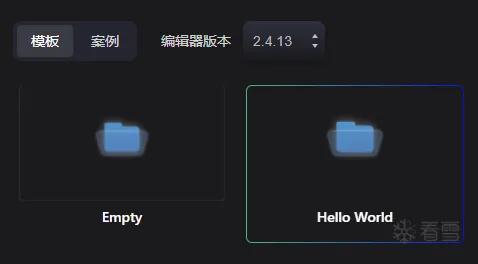
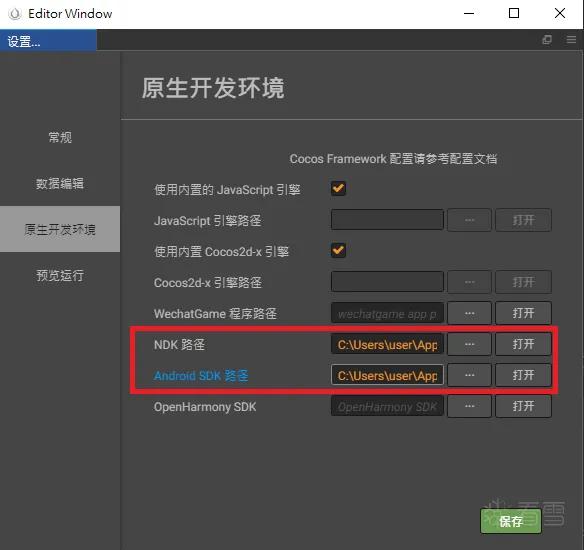
首先要設置SDK和NDK路徑
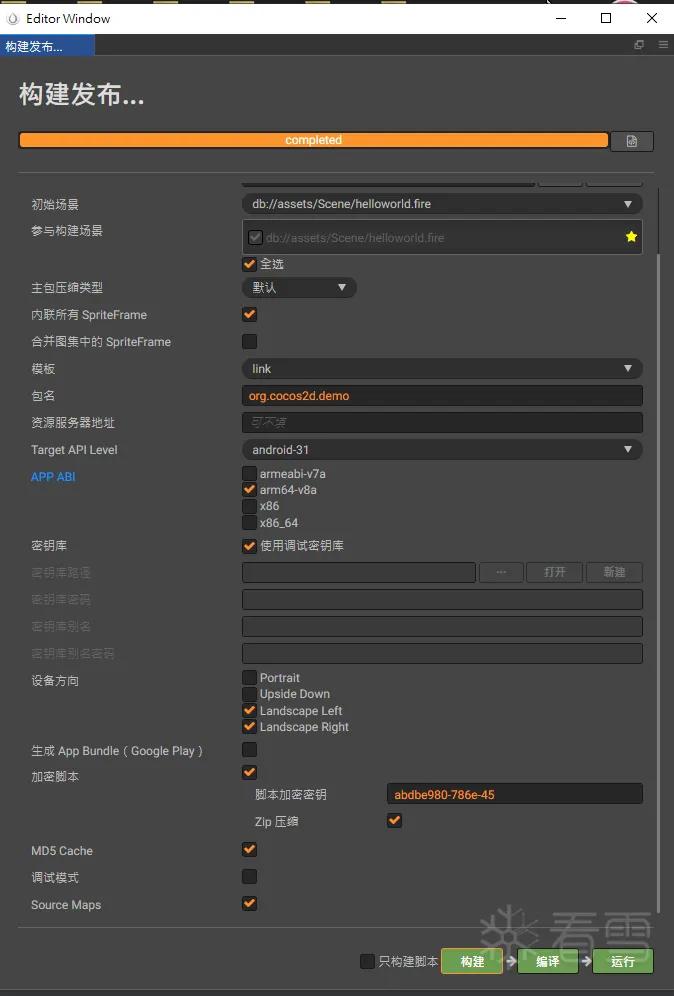
然後構建的參數設置如下,主要需要設置以下兩點:
- 加密腳本:全都勾上,密鑰用默認的
- Source Map:保留符號,這樣IDA在打開時才能看到函數名
我使用Cocos Creator能順利構建,但無法編譯,只好改用Android Studio來編譯。
使用Android Studio打開build\jsb-link\frameworks\runtime-src\proj.android-studio,然後就可以按正常AS流程進行編譯
Demo如下所示,在中心輸出了Hello, World!。

jsc腳本解密
上述Demo構建中有一個選項是【加密腳本】,它會將js腳本通過xxtea算法加密成.jsc。
而遊戲的一些功能就會通過js腳本來實現,因此cocos2djs逆向首要事件就是將.jsc解密,通常.jsc會存放在apk內的assets目錄下
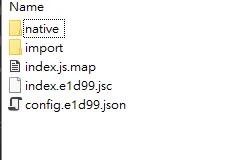
獲取解密key
方法一:從applicationDidFinishLaunching入手
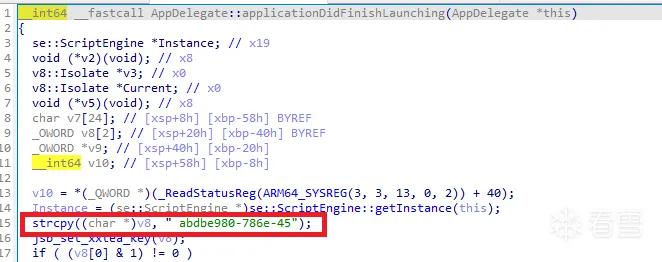
方法二:HOOK
- hook
set_xxtea_key
// soName: libcocos2djs.so
function hook_jsb_set_xxtea_key(soName) {
    let set_xxtea_key = Module.findExportByName(soName, "_Z17jsb_set_xxtea_keyRKNSt6__ndk112basic_stringIcNS_11char_traitsIcEENS_9allocatorIcEEEE");
    Interceptor.attach(set_xxtea_key,{
        onEnter(args){
            console.log("xxtea key: ", args[0].readCString())
        },
        onLeave(retval){

        }
    })
}
- hook
xxtea_decrypt
function hook_xxtea_decrypt(soName) {
    let set_xxtea_key = Module.findExportByName(soName, "xxtea_decrypt");
    Interceptor.attach(set_xxtea_key,{
        onEnter(args){
            console.log("xxtea key: ", args[2].readCString())
        },
        onLeave(retval){

        }
    })
}
python加解密腳本
一次性解密output_dir目錄下所有.jsc,並在input_dir生成與output_dir同樣的目錄結構。
1 2 3 4 5 6 7 8 9 10 11 12 13 14 15 16 17 18 19 20 21 22 23 24 25 26 27 28 29 30 31 32 33 34 35 36 37 38 39 40 41 42 43 44 45 46 47 48 49 50 51 52 53 54 55 56 57 58 59 60 61 62 63 64 65 66 67 68 69 70 71 72 73 74 75 76 77 78 79 | # pip install xxtea-py# pip install jsbeautifierimport xxteaimport gzipimport jsbeautifierimport osKEY = "abdbe980-786e-45"input_dir = r"cocos2djs_demo\assets" # abs pathoutput_dir = r"cocos2djs_demo\output" # abs pathdef jscDecrypt(data: bytes, needJsBeautifier = True): dec = xxtea.decrypt(data, KEY) jscode = gzip.decompress(dec).decode() if needJsBeautifier: return jsbeautifier.beautify(jscode) else: return jscodedef jscEncrypt(data): compress_data = gzip.compress(data.encode()) enc = xxtea.encrypt(compress_data, KEY) return encdef decryptAll(): for root, dirs, files in os.walk(input_dir): # 創建與input_dir一致的結構 for dir in dirs: dir_path = os.path.join(root, dir) target_dir = output_dir + dir_path.replace(input_dir, "") if not os.path.exists(target_dir): os.mkdir(target_dir) for file in files: file_path = os.path.join(root, file) if not file.endswith(".jsc"): continue with open(file_path, mode = "rb") as f: enc_jsc = f.read() dec_jscode = jscDecrypt(enc_jsc) output_file_path = output_dir + file_path.replace(input_dir, "").replace(".jsc", "") + ".js" print(output_file_path) with open(output_file_path, mode = "w", encoding = "utf-8") as f: f.write(dec_jscode)def decryptOne(path): with open(path, mode = "rb") as f: enc_jsc = f.read() dec_jscode = jscDecrypt(enc_jsc, False) output_path = path.split(".jsc")[0] + ".js" with open(output_path, mode = "w", encoding = "utf-8") as f: f.write(dec_jscode)def encryptOne(path): with open(path, mode = "r", encoding = "utf-8") as f: jscode = f.read() enc_data = jscEncrypt(jscode) output_path = path.split(".js")[0] + ".jsc" with open(output_path, mode = "wb") as f: f.write(enc_data)if __name__ == "__main__": decryptAll() |
jsc文件的2種讀取方式
為實現對遊戲正常功能的干涉,顯然需要修改遊戲執行的js腳本。而替換.jsc文件是其中一種思路,前提是要找到讀取.jsc文件的地方。
方式一:從apk裡讀取
我自己編譯的Demo就是以這種方式讀取/data/app/XXX/base.apk裡assets目錄內的.jsc文件。
cocos引擎默認使用xxtea算法來對.jsc等腳本進行加密,因此讀取.jsc的操作定然在xxtea_decrypt之前。
跟cocos2d-x源碼,找使用xxtea_decrypt的地方,可以定位到LuaStack::luaLoadChunksFromZIP
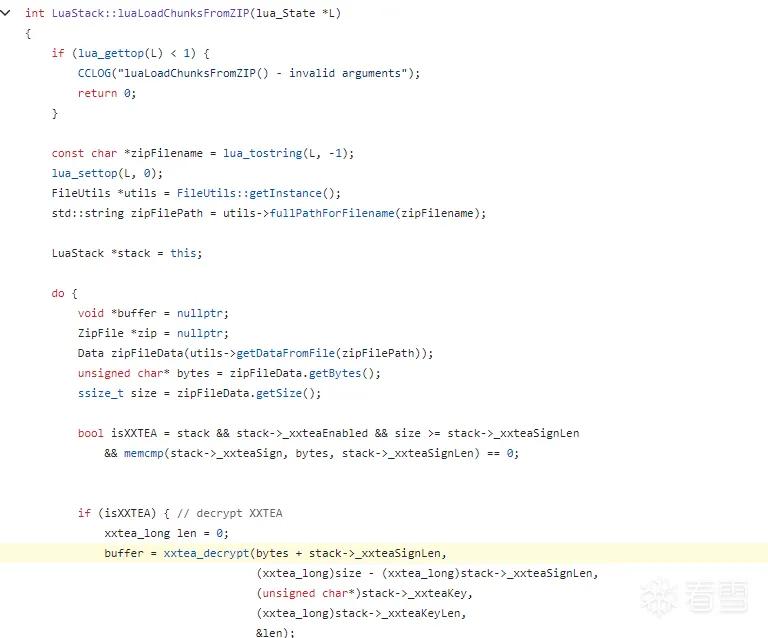
向上跟會發現它的bytes數據是由getDataFromFile函數獲取
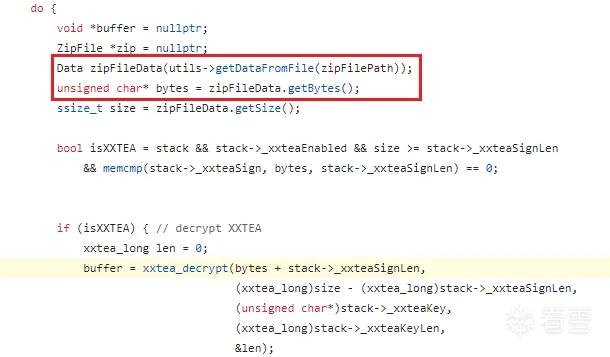
繼續跟getDataFromFile的邏輯,它會調用getContents,而getContents裡是調用fopen來打開,但奇怪的是hook fopen卻沒有發現它有打開任何.jsc文件
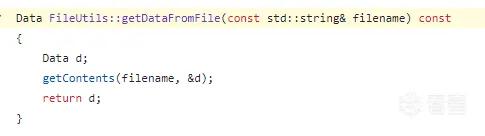
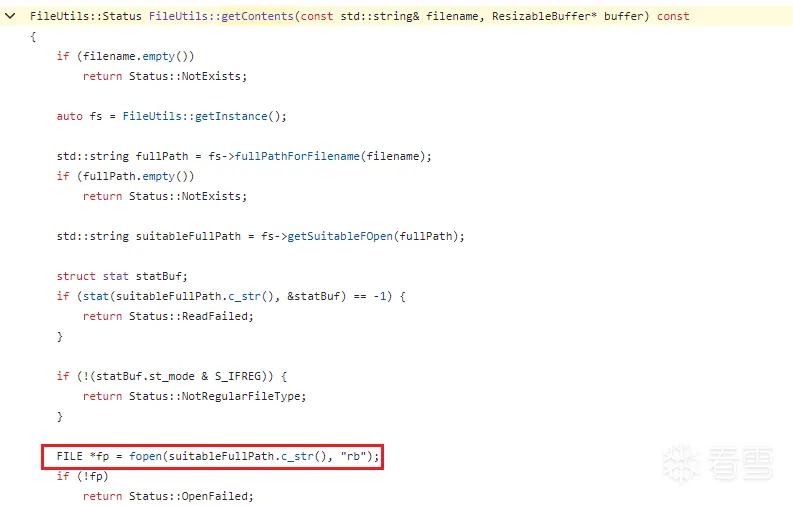
後來發現調用的並非FileUtils::getContents,而是FileUtilsAndroid::getContents。
它其中一個分支是調用libandroid.so的AAsset_read來讀取.jsc數據,調用AAssetManager_open來打開.jsc文件。
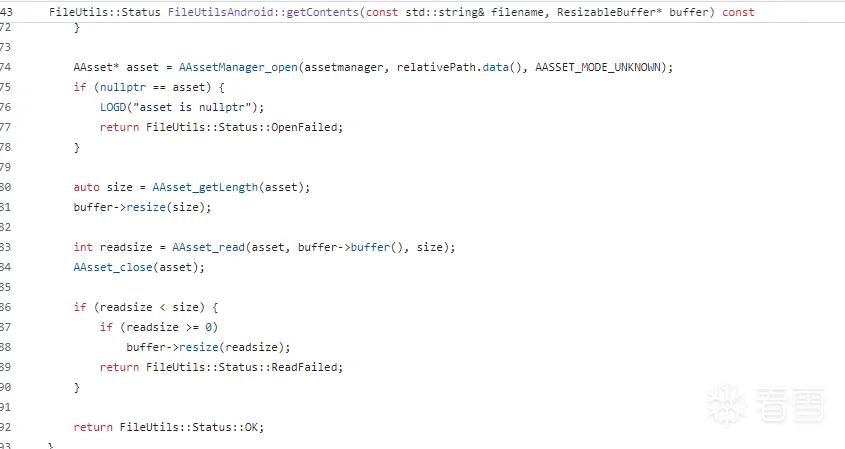
繼續對AAssetManager_open進行深入分析( 在線源碼 ),目的是找到能夠IO重定向的點:
AAssetManager_open裡調用了AssetManager::open函數
1 2 3 4 5 6 7 8 9 10 11 12 13 14 15 16 17 18 19 20 21 22 23 24 25 26 27 28 29 30 | // frameworks/base/native/android/asset_manager.cppAAsset* AAssetManager_open(AAssetManager* amgr, const char* filename, int mode){ Asset::AccessMode amMode; switch (mode) { case AASSET_MODE_UNKNOWN: amMode = Asset::ACCESS_UNKNOWN; break; case AASSET_MODE_RANDOM: amMode = Asset::ACCESS_RANDOM; break; case AASSET_MODE_STREAMING: amMode = Asset::ACCESS_STREAMING; break; case AASSET_MODE_BUFFER: amMode = Asset::ACCESS_BUFFER; break; default: return NULL; } AssetManager* mgr = static_cast<AssetManager*>(amgr); // here Asset* asset = mgr->open(filename, amMode); if (asset == NULL) { return NULL; } return new AAsset(asset);} |
AssetManager::open調用openNonAssetInPathLocked
1 2 3 4 5 6 7 8 9 10 11 12 13 14 15 16 17 18 19 20 21 22 | // frameworks/base/libs/androidfw/AssetManager.cppAsset* AssetManager::open(const char* fileName, AccessMode mode){ AutoMutex _l(mLock); LOG_FATAL_IF(mAssetPaths.size() == 0, "No assets added to AssetManager"); String8 assetName(kAssetsRoot); assetName.appendPath(fileName); size_t i = mAssetPaths.size(); while (i > 0) { i--; ALOGV("Looking for asset '%s' in '%s'\n", assetName.string(), mAssetPaths.itemAt(i).path.string()); // here Asset* pAsset = openNonAssetInPathLocked(assetName.string(), mode, mAssetPaths.itemAt(i)); if (pAsset != NULL) { return pAsset != kExcludedAsset ? pAsset : NULL; } } return NULL;} |
AssetManager::openNonAssetInPathLocked先判斷assets是位於.gz還是.zip內,而.apk與.zip基本等價,因此理應會走else分支。
1 | 奇怪的是當我使用frida hook驗證時,能順利hook到`openAssetFromZipLocked`,卻hook不到`getZipFileLocked`,顯然是不合理的。 |
1 2 3 4 5 6 7 8 9 10 11 12 13 14 15 16 17 18 19 20 21 22 23 24 25 26 27 28 29 30 31 32 33 34 35 36 37 38 39 40 41 42 43 44 45 46 47 | // frameworks/base/libs/androidfw/AssetManager.cppAsset* AssetManager::openNonAssetInPathLocked(const char* fileName, AccessMode mode, const asset_path& ap){ Asset* pAsset = NULL; if (ap.type == kFileTypeDirectory) { String8 path(ap.path); path.appendPath(fileName); pAsset = openAssetFromFileLocked(path, mode); if (pAsset == NULL) { /* try again, this time with ".gz" */ path.append(".gz"); pAsset = openAssetFromFileLocked(path, mode); } if (pAsset != NULL) { //printf("FOUND NA '%s' on disk\n", fileName); pAsset->setAssetSource(path); } // run this branch } else { String8 path(fileName); // here ZipFileRO* pZip = getZipFileLocked(ap); if (pZip != NULL) { ZipEntryRO entry = pZip->findEntryByName(path.string()); if (entry != NULL) { pAsset = openAssetFromZipLocked(pZip, entry, mode, path); pZip->releaseEntry(entry); } } if (pAsset != NULL) { pAsset->setAssetSource( createZipSourceNameLocked(ZipSet::getPathName(ap.path.string()), String8(""), String8(fileName))); } } return pAsset;} |
嘗試繼續跟剛剛hook失敗的AssetManager::getZipFileLocked,它調用的是AssetManager::ZipSet::getZip。
1 | 同樣用frida hook `getZip`,這次成功了,猜測是一些優化移除了`getZipFileLocked`而導致hook 失敗。 |
1 2 3 4 5 6 7 | // frameworks/base/libs/androidfw/AssetManager.cppZipFileRO* AssetManager::getZipFileLocked(const asset_path& ap){ ALOGV("getZipFileLocked() in %p\n", this); return mZipSet.getZip(ap.path);} |
ZipSet::getZip會調用SharedZip::getZip,後者直接返回mZipFile。
1 2 3 4 5 6 7 8 9 10 11 12 13 14 15 16 | // frameworks/base/libs/androidfw/AssetManager.cppZipFileRO* AssetManager::ZipSet::getZip(const String8& path){ int idx = getIndex(path); sp<SharedZip> zip = mZipFile[idx]; if (zip == NULL) { zip = SharedZip::get(path); mZipFile.editItemAt(idx) = zip; } return zip->getZip();}ZipFileRO* AssetManager::SharedZip::getZip(){ return mZipFile;} |
尋找mZipFile賦值的地方,最終會找到是由ZipFileRO::open(mPath.string())賦值。
1 2 3 4 5 6 7 8 9 10 11 12 13 14 15 | // frameworks/base/libs/androidfw/AssetManager.cppAssetManager::SharedZip::SharedZip(const String8& path, time_t modWhen) : mPath(path), mZipFile(NULL), mModWhen(modWhen), mResourceTableAsset(NULL), mResourceTable(NULL){ if (kIsDebug) { ALOGI("Creating SharedZip %p %s\n", this, (const char*)mPath); } ALOGV("+++ opening zip '%s'\n", mPath.string()); // here mZipFile = ZipFileRO::open(mPath.string()); if (mZipFile == NULL) { ALOGD("failed to open Zip archive '%s'\n", mPath.string()); }} |
1 | 從`frameworks/base/libs/androidfw/Android.bp`可知上述代碼的lib文件是`libandroidfw.so`,位於`/system/lib64/`下。將其pull到本地然後用IDA打開,就能根據IDA所示的函數導出名稱/地址對這些函數進行hook。 |
方式二:從應用的數據目錄裡讀取
無論是方式一還是方式二,.jsc數據都是通過getDataFromFile獲取。而getDataFromFile裡調用了getContents。
1 | getDataFromFile -> getContents |
在方式一中,我一開始看的是FileUtils::getContents,但其實是FileUtilsAndroid::getContents才對。
只有當fullPath[0] == '/'時才會調用FileUtils::getContents,而FileUtils::getContents會調用fopen來打開.jsc
1 2 3 4 5 6 7 8 9 10 11 12 13 14 15 | // https://github.com/cocos2d/cocos2d-x/blob/76903dee64046c7bfdba50790be283484b4be271/cocos/platform/android/CCFileUtils-android.cppFileUtils::Status FileUtilsAndroid::getContents(const std::string& filename, ResizableBuffer* buffer) const{ static const std::string apkprefix("assets/"); if (filename.empty()) return FileUtils::Status::NotExists; string fullPath = fullPathForFilename(filename); if (fullPath[0] == '/') // here return FileUtils::getContents(fullPath, buffer); // 方式一會走這裡....} |
替換思路
正常來說有以下幾種替換腳本的思路:
找到讀取
.jsc文件的地方進行IO重定向。直接進行字節替換,即替換
xxtea_decypt解密前的.jsc字節數據,或者替換xxtea_decypt解密後的明文.js腳本。這裡的替換是指開闢一片新內存,將新的數據放到這片內存,然後替換指針的指向。
直接替換apk裡的
.jsc,然後重打包apk。替換js明文,不是像
2那樣開闢一片新內存,而是直接修改原本內存的明文js數據。
經測試後發現只有1、3、4是可行的,2會導致APP卡死( 原因不明??? )。
思路一實現
從上述可知第一種.jsc讀取方式會先調用ZipFileRO::open(mPath.string())來打開apk,之後再通過AAssetManager_open來獲取.jsc。
hook ZipFileRO::open看看傳入的參數是什麼。
function hook_ZipFile_open(flag) {
    let ZipFile_open = Module.getExportByName("libandroidfw.so", "_ZN7android9ZipFileRO4openEPKc");
    console.log("ZipFile_open: ", ZipFile_open)
    return Interceptor.attach(ZipFile_open,
        {
            onEnter: function (args) {
                console.log("arg0: ", args[0].readCString());
            },
            onLeave: function (retval) {

            }
        }
    );
}
可以看到其中一條是當前APK的路徑,顯然assets也是從這裡取的,因此這裡是一個可以嘗試重定向點,先需構造一個fake.apk push 到/data/app/XXX/下,然後hook IO重定向到fake.apk實現替換。

對我自己編譯的Demo而言,無論是以apktool解包&重打包的方式,還是直接解壓縮&重壓縮&手動命名的方式來構建fake.apk都是可行的,但要記得賦予fake.apk最低644的權限。
以下是我使用上述方法在我的Demo中實踐的效果,成功修改中心的字符串。
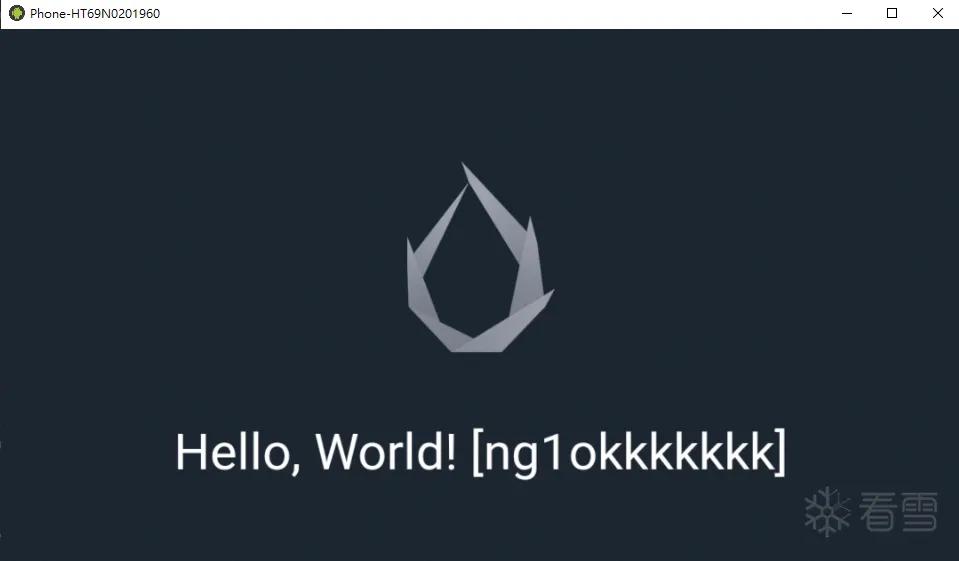
但感覺這種方式的實用性較低( 什至不如直接重打包… )
思路二嘗試(失敗)
連這樣僅替換指針指向都會導致APP卡死??
function hook_xxtea_decrypt() {
    Interceptor.attach(Module.findExportByName("libcocos2djs.so", "xxtea_decrypt"), {
        onEnter(args) {
            let jsc_data = args[0];
            let size = args[1].toInt32();
            let key = args[2].readCString();
            let key_len = args[3].toInt32();
            this.arg4 = args[4];

            let target_list = [0x15, 0x43, 0x73];
            let flag = true;
            for (let i = 0; i < target_list.length; i++) {
                if (target_list[i] != Memory.readU8(jsc_data.add(i))) {
                    flag = false;
                }
            }
            this.flag = flag;
            if (flag) {
                let new_size = size;
                let newAddress = Memory.alloc(new_size);
                Memory.protect(newAddress, new_size, "rwx")
                Memory.protect(args[0], new_size, "rwx")
                Memory.writeByteArray(newAddress, jsc_data.readByteArray(new_size))
                args[0] = newAddress;
            }

        },
        onLeave(retval) {
        }
    })

}
思路四實現
參考這位大佬的文章可知cocos2djs內置的v8引擎最終通過evalString來執行.jsc解密後的js代碼。
在正式替換前,最好先通過hook evalString的方式保存一份目標js( 因為遊戲的熱更新策略等原因,可能導致evalString執行的js代碼與你從apk裡手動解密.jsc得到的js腳本有所不同 )。
function saveJscode(jscode, path) {
    var fopenPtr = Module.findExportByName("libc.so", "fopen");
    var fopen = new NativeFunction(fopenPtr, 'pointer', ['pointer', 'pointer']);
    var fclosePtr = Module.findExportByName("libc.so", "fclose");
    var fclose = new NativeFunction(fclosePtr, 'int', ['pointer']);
    var fseekPtr = Module.findExportByName("libc.so", "fseek");
    var fseek = new NativeFunction(fseekPtr, 'int', ['pointer', 'int', 'int']);
    var ftellPtr = Module.findExportByName("libc.so", "ftell");
    var ftell = new NativeFunction(ftellPtr, 'int', ['pointer']);
    var freadPtr = Module.findExportByName("libc.so", "fread");
    var fread = new NativeFunction(freadPtr, 'int', ['pointer', 'int', 'int', 'pointer']);
    var fwritePtr = Module.findExportByName("libc.so", "fwrite");
    var fwrite = new NativeFunction(fwritePtr, 'int', ['pointer', 'int', 'int', 'pointer']);

    let newPath = Memory.allocUtf8String(path);

    let openMode = Memory.allocUtf8String('w');

    let str = Memory.allocUtf8String(jscode);

    let file = fopen(newPath, openMode);
    if (file != null) {
        fwrite(str, jscode.length, 1, file)
        fclose(file);

    }
    return null;
}

function hook_evalString() {
    Interceptor.attach(Module.findExportByName("libcocos2djs.so", "_ZN2se12ScriptEngine10evalStringEPKclPNS_5ValueES2_"), {
        onEnter(args) {
            let path = args[4].readCString();
            path = path == null ? "" : path;
            let jscode = args[1];
            let size = args[2].toInt32();
            if (path.indexOf("assets/script/index.jsc") != -1) {
                saveJscode(jscode.readCString(), "/data/data/XXXXXXX/test.js");
            }
        }
    })
}
利用Memory.scan來找到修改的位置
function findReplaceAddr(startAddr, size, pattern) {
    Memory.scan(startAddr, size, pattern, {
        onMatch(address, size) {
            console.log("target offset: ", ptr(address - startAddr))
            return 'stop';
        },
        onComplete() {
            console.log('Memory.scan() complete');
        }
    });
}

function hook_evalString() {
    Interceptor.attach(Module.findExportByName("libcocos2djs.so", "_ZN2se12ScriptEngine10evalStringEPKclPNS_5ValueES2_"), {
        onEnter(args) {
            let path = args[4].readCString();
            path = path == null ? "" : path;
            let jscode = args[1];
            let size = args[2].toInt32();
            if (path.indexOf("assets/script/index.jsc") != -1) {
                let pattern = "76 61 72 20 65 20 3D 20 64 2E 50 6C 61 79 65 72 41 74 74 72 69 62 75 74 65 43 6F 6E 66 69 67 2E 67 65 74 44 72 65 61 6D 48 6C 70 65 49 74 65 6D 44 72 6F 70 28 29 2C";
                findReplaceAddr(jscode, size, pattern);
            }
        }
    })
}
最後以Memory.writeU8來逐字節修改,不用Memory.writeUtf8String的原因是它默認會在最終添加'\0'而導致報錯。
function replaceEvalString(jscode, offset, replaceStr) {
    for (let i = 0; i < replaceStr.length; i++) {
        Memory.writeU8(jscode.add(offset + i), replaceStr.charCodeAt(i))
    }
}

// 例:
function cheatAutoChopTree(jscode) {
    let replaceStr = 'true || "                                 "';
    replaceEvalString(jscode, 0x3861f6, replaceStr)
}
某砍樹手遊實踐
以某款砍樹遊戲來進行簡單的實踐。
遊戲有自動砍樹的功能,但需要符合一定條件

如何找到對應的邏輯在哪個.jsc中?直接搜字符串就可以。
利用上述替換思路4來修改對應的js判斷邏輯,最終效果:

結語
思路4那種替換手段有大小限制,不能隨意地修改,暫時還未找到能隨意修改的手段,有知道的大佬還請不嗇賜教,有任何想法也歡迎交流^^
後記
在評論區的一位大佬指點下,終於是找到一種更優的替換方案,相比起思路4來說要方便太多了。
最開始時我其實也嘗試過這種直接的js明文替換,但APP會卡死/閃退,現在才發現是frida的api所致,那時在開辟內存空間時使用了Memory.alloc、Memory.allocUtf8String,改成使用libc.so的malloc就不會閃退了,具體為什麼會這樣我也不清楚,看看以後有沒有機會研究下frida的源碼吧^^
 mb_eunzmkbp